Automate Creation of Active Directory Accounts
When you automate the creation of AD accounts, you need to create a user account template and then each time you need to create a user, you can copy the template and add the user details. The new account will be created will all the template details.
To create a user account template:
- Create two OUs Staff and Group and create a Marketing group in the Group OU (for this example).
- Click Start->Settings->Control Panel->Administrative tools->Active Directory Users and Computers.
- Expand the domain tree and right-click the Staff OU.
- Select New->User from the menu that appears, as shown in Figure 5-1.
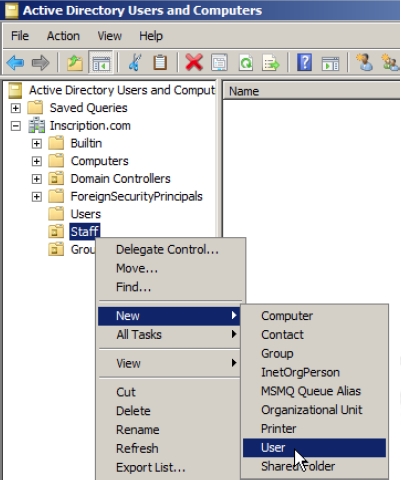
Figure 5-1 The New Object –User dialog box appears, as shown in Figure 5-2.
- Type the template name prefixed with underscore (“_”) in the First name and then type Template in the Last name field . The underscore ensures that the template appears at the top of the list of users.
- Provide the user logon name prefixed with underscore and click Next.
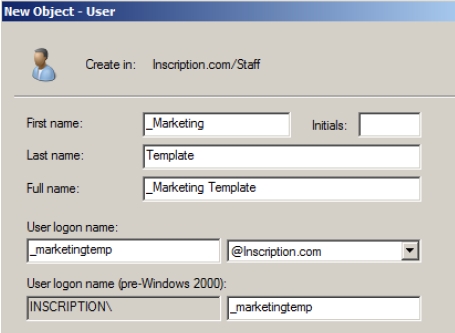
Figure 5-2 The second page of the New Object –User wizard appears.
- Type a password in the Password field and then confirm the password by retyping the password in Confirm password field.
- Select Account is disabled option and then click Next and on the next page click Finish.
The template is now ready and you can see the template appearing in the Staff OU. You can now set the other properties in the template that you want to be set in all the users that are created using this template.
- Double-click the template to open the properties window of the template as shown in Figure.
- Click Organization tab and then set the Department and the Company fields with desired values. For this example set Marketing in the Department field and Inscription in the Company field, as shown in Figure 5-3.
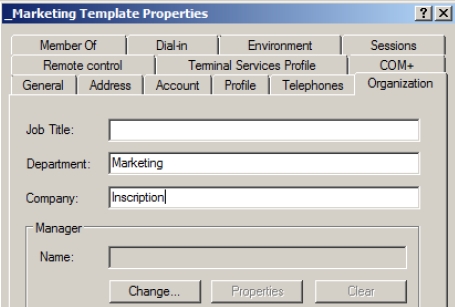
Figure 5-3 - Click Member Of tab and then add the Marketing group to the list by clicking the Add button, as shown in Figure 5-4.

Figure 5-4 - Click the Profile tab and then type the \\
\profiles\%username% in the Profile path field, where
is the name of your server, as shown in Figure 5-5: 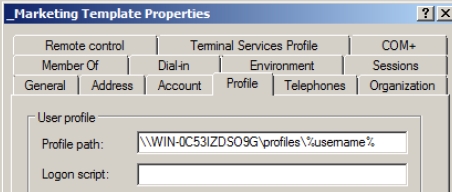
Figure 5-5 - Click OK to save the properties set.
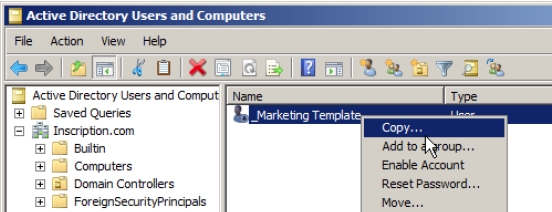
You can now right-click the template and select Copy from the menu that appears to open the Copy Object –User dialog box, as shown in Figure 5-6. The dialog box allows you to create a new user with the same properties that you have set in the template. You just need to follow the initial steps that you follow in the New Object –User wizard to create a user.
Besides creating the multiple users using a template, you can also automate the task of creating users by using command line tools such as the Dsadd command and import the users from a text file using CSVDE and LDIFE commands.
To add user called Jim using Dsadd, you need to type the following command at the command prompt:
dsadd user cn=Jim,cn=users,dc=MyDomain,dc=com -disabled no
CSVDE and LDIFDE commands can be used for the bulk export and import of Active Directory objects. CSVDE allows exporting of virtually any object or attribute from the AD database whereas LDIFDE.exe exports the data into LDIF-based (LDAP Data Interchange Format) files. Another difference is that LDIFDE is primarily used to modify or delete Active Directory Objects.
Type the following command to the command prompt to import directory objects:
csvde -i -f filename -s servername:port -m -a username domain password
Type the following command to the command prompt to export directory objects:
csvde -e -f filename -s servername:port -m a username domain password
You can also use CSVDE to import users from a text file. Consider you have a text file called newusers that has values:
DN,objectClass,sAMAccountName,sn.givenName,userPrincipalName “cn=Michel.Crisp,ou=People,dc=inscription,dc=com”,user,michel.crisp,Michel,Crisp,mi chel.crisp@inscription.com “cn=Ben.Jhonson,ou=People,dc=inscription,dc=com”,user,ben.jhonson,Ben,Jhonson,ben. jhonson@inscription.com
You can now type the following command to import user records from the newuser.txt
Csvde –I –f newusers.txt –k
The LDIFDE.EXE does not want a typical delimited file. To create a .ldf file from which you can import user records, you need to save the text file with .ldf extension. The values in the .ldf files can be written as:
DN cn=ben jhonson, OU=people, dc=inscription,dc=com changeType: add CN: Ben Jhonson objectClass: user sAMAccountName: ben.jhonson userPrincipalName: ben.jhonson&inscription.com givenName: Ben sn: Jhonson displayName:Jhonson, Ben mail: ben.jhonson@inscription.com description: Sales representatives title: Sales representatives department: sales company: inscription, ltd
You can now type the following command to import user records from the newuser.ldf
Ldifde –I –f newusers.ldf -k