Configure CA Server Settings
You can manually modify the issuing server settings after deploying your server. The configuration of root CA involves certain settings to be finalized. You need to create a certificate revocation configuration and personalize certificate templates according to your requirements and the configure enrollment and issuance options.
For example, if you want to use EFS to protect data, then you need to configure certificates to be used for EFS. If you want to use wireless network then you need to configure wireless certificates and if you want to use smart card then you need to configure certificates to be used for smart cards.
Although the default settings work fine for the root CA that you have installed, it is advised to review all important settings before continuing.
To review the settings, you need to:
- Click Start->Settings->Administrative Tools->Certificate Authority
- Right-click the root CA and select Properties from the menu that appears. The properties window of the Root CA appears.
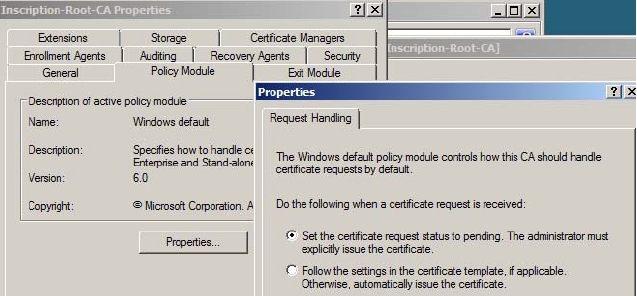
The General tab contains the View Certificate button that allows you to see the Details of the root CA certificate. The Policy Module tab allows you to define whether certificate requests should be processed automatically or manually. Click the Properties button to Set the certificate request status to pending option, as shown in Figure 7-6. For root CA, you should set the certificate request status to pending to ensure that you can manually issue the Issuing CA certificate request later on.
The Exit Module tab allows you to define whether you want to publish certificates to the file system or not. The Extensions tab allows you to define the CDP and AIA parameters. On the root CA, only allow publication to local file system and http. If you are using OCSP, enable Include in the online certificate status protocol (OCSP) extension.
The Storage tab allows you to set the storage space for the data of the CA For a standalone root CA, this will be a location on a disk. For an Enterprise root CA, this will be AD. The Certificate Managers tab allows you to delegate access to some specific templates and Enrollment Agents and Recovery Agents tabs are only supported on Enterprise CA. On the Auditing tab you should select all the events for auditing.
The Security tab allows you to define the Read, Issue/Manage Certificates, Manage the CA and Request Certificates permissions. For the root CA, you should limit the number of people having access to this CA.
After you configure or verify all the settings, you need to, restart the certificate services by typing the following command on the command line.
net stop certsvc
net start certsvc
Before issuing any certificate
Before issuing any certificate it is important to verify that all the settings are configured and are working. To verify settings, you can publish a certificate by right-clicking the Revoked Certificates node and then selecting All Tasks –> Publish. Verify that the certificate file is created under C:\certs\cdp