Configure Active Directory Rights Management Service (AD RMS)


IT Certification

Before you configure AD RMS, you need to:
Install AD RMS
  1. Click Start-> Administrative Tools->Server Manager-> Roles Summary-> Add Roles
  2. Click Next on the first page of the Add Roles Wizard that appears.
  3. Select Active Directory Rights Management Services option on the Select Server Roles page, as shown in Figure 4-29.
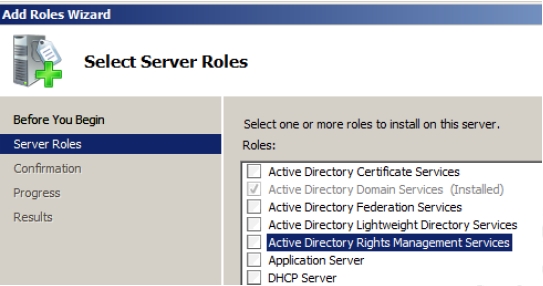
    Figure 4-29
  4. Click Next. The role services page appears.
  5. Ensure that Web Server (IIS), Windows Process Activation Service (WPAS), and Message Queuing options are selected and then click Add Required Role Services.
  6. Click Next. the AD RMS introduction page appears
  7. Verify that the Active Directory Rights Management Server is selected on the Select Role Services page and click Next.
  8. Select Create a new AD RMS cluster option and click Next on the Create or join an AD RMS Cluster page that appears, as shown in Figure 4-30.
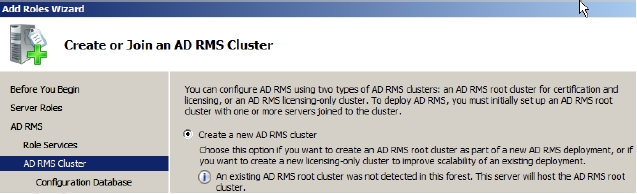
    Figure 4-30
  9. Select the Use a different database server option and then browse the name of the computer that is hosting AD RMS databases and then click Next.
  10. Click Select to locate the database server and type the name of the database server, click Check names and then click OK.
  11. Choose the appropriate database instance from the Database Instance dropdown, click Validate and then click Next.
  12. Click Specify and then type the domain user account and password that should be used as the AD RMS service account on the Specify Service Account page that appears, as shown in Figure 4-31.
  13. Click OK, and then click Next.
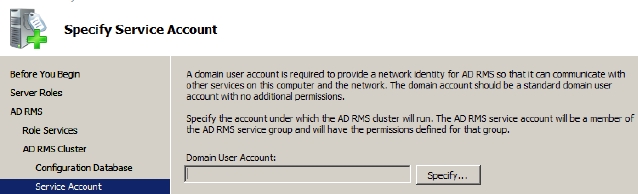
    Figure 4-31

    The Configure AD RMS Cluster Key Storage page appears.

  14. Ensure that the Use AD RMS centrally managed key storage option is selected, and then click Next. The Specify AD RMS Cluster Key Password page appears.
  15. Type a strong password in the Password field, rewrite the password again in the Confirm password field, and then click Next. The Select AD RMS Cluster Web Site page appears.
  16. Select Default Web Site or select the web site where the AD RMS Web services will be installed and then click Next. The Specify Cluster Address page appears.
  17. Select the Use an SSL-encrypted connection (https://) option.
  18. Type the FQDN name of the AD RMS cluster in the InternalAddress field, and then click Validate. If validation succeeds, the Next button becomes active.
  19. Click Next. The Choose a Server Authentication Certificate for SSL Encryption page appears.
  20. Select the Choose an existing certificate for SSL encryption (Recommended) option, select the appropriate certificate or click Import to import the certificate, and then click Next. The Server Licensor Certificate page appears.
  21. Provide a name that helps you identify the AD RMS cluster in the Friendly name field, and then click Next. The Register AD RMS Service Connection Point page appears.
  22. Ensure that the Register the AD RMS service connection point now option is selected, and then click Next. This action will register the AD RMS service connection point (SCP) in AD DS. The Introduction to Web Server (IIS) page appears.
  23. Click Next. The Select Role Services page appears.
  24. Accept the defaults and click Next. The Confirm Installation Selection page appears.
  25. Review your choices and then click Install.
  26. Click Finish when the installation completes.
  27. Log off from the server, and then log back again. Update the permissions granted to the logged on user account.This user account will automatically become a member of the AD RMS Enterprise Administrators group.

Creating an AD LDS instance

To create an AD LDS instance, you need to:
  1. Install AD LDS on your server, using Add Roles Wizard through Server Manager.You can now start using AD LDS service by creating an AD LDS instance for the desired application. To create an AD LDS instance, you need to:
  2. Click Start->Settings->Control Panel->Administrative Tools
  3. Select Active Directory Lightweight Directory Services Setup Wizard tool, as shown in Figure 4-1.
    Figure 4-1
  4. Click Next on the Active Directory Lightweight Directory Services Setup Wizard that appears.The Setup Option page of the wizard appears, as shown in Figure 4-2. The page provides you option to create A unique instance or A replica of an existing instance.
  5. Select A unique instance option and click Next. Select the mentioned option because you are creating your first AD LDS instance in this example.
    Figure 4-2

    The Instance Name page appears, as shown in Figure 4-3.

  6. Provide a meaningful instance name in the Instance name field and click Next.A meaningful instance name allows you to identify an instance that is tied to an application on the local computer. It also allows you to identify the associated files and the service that supports the instance.
    Figure 4-3

    The page displays the first available communication ports that AD LDS instance would use for communication on this computer. Usually port 389 is provided by default in LDAP port number field and port 636 is provided in SSL port number field. These ports are the default ports for AD DS service also.

    Because both these services use the same ports, Microsoft recommends using different server computers for both these services. However, there is no such restriction. If you want to use both the services on the same computer, you need to specify different ports for both these services.

    If the wizard detects that AD DS is already installed on server and ports 389 and 636 are already in use, it proposes first available communication ports starting from 50000. It therefore proposes 50000 and 50001 ports for LDAP port number and SSL port number fields respectively.

  7. Modify the default port numbers to 50000 and 50001 ports for LDAP port number and SSL port number fields respectively if AD DS is not already installed on server but you decide to install it in future else keep the default ports.
  8. Click Next.
    Figure 4-4

    The Application Directory Partition page appears, as shown in Figure 4-5.

    The application Directory partitions store Domain Name System (DNS) zones in a data structure in such a way that the data of the different zones can be distinguished for different replication purposes. The application directory partitions are created to control the scope of replication for the zone that is stored in that partition.

    The page allows you to specify the name of Active Directory application partition name that you want to use for this instance. You can choose to create a new application partition or decide to proceed without creating a partition. If you decide to proceed without creating a partition you need to manually create a partition after the creation of AD LDS instance. You can use AD LDS administration tools later to create an application directory partition or create an application partition at the time of installing your directory-enabled application and tying it to an AD LDS instance.

    You must specify a unique distinguished name for the partition in the following format:
    CN=,DC=
    The partition name is based on the fully qualified domain name. For example, if the instance name is myfirstADDLSinstance and the server name is Inscription.com, then the partition name would be represented as:

    CN= myfirstADDLSinstance,DC=Inscription,DC=com

  9. Specify a unique distinguished name for the partition in the Partition name field and click Next.
    Figure 4-5

    The File Locations page appears, as shown in Figure 4-6.

    The page allows you to specify the locations of files associated with this AD LDS instance.

  10. Provide a file location by typing or browsing the location for associated data files in Data files field and for data recovery files in Data recovery files fields respectively and click Next.
    Figure 4-6

    The Service Account Selection page appears, as shown in Figure 4-7.

    The page allows you to select a service account that will be used to run this AD LDS instance according to the permissions associated with the selected account. You can use Network service account option if you have to manage just one AD LDS instance. However, if you have many AD LDS instances then it is better to use service account or This account option for each instance

  11. Select the desired account. Provide the credentials of the service account in the User name and Password fields if you choose This account option.
  12. Click Next. The AD LDS Administrators page appears, as shown in Figure.The page allows you to select user account that will administer this AD LDS instance. It is always better to select a group on this page so that a group would have the rights to administer the AD LDS instance. This is because if the personnel change, in a group, members can be added or changed but an individual account is difficult to change.
  13. Select Currently logged on user option if you want the current user to administer the instance. Alternatively, select This account option and Browse the individual account or a group account that you want to use to manage this AD LDS instance.
  14. Click Next.
    Figure 4-7

    The Importing LDIF Files page appears, as shown in Figure 4-8.

    The LDIF files extend the schema of the AD LDS instance. By default the seven LDIF
    files are available. These files are:
    • MS-AdamSyncMetadata.ldf: Required to synchronize data between an AD DS forest and an AD LDS instance through ADAMsync.
    • MS-ADLDS-DisplaySpecifiers.ldf: Required for Active Directory Sites and Services snap-in operation.
    • MS-AZMan.ldf: Required to support Windows Authorization Manager.
    • MS-InetOrgPerson.ldf: Required to create inetOrgPerson user classes and attributes.
    • MS-User.ldf: Required to create user classes and attributes.
    • MS-UserProxy.ldf: Required to create a simple userProxy class.
    • MS-UserProxyFull.ldf: Required to create a full userProxy class.
    Besides these seven LDF files, the following LDF files are also available:
      • MSadamschewmaw2k3.ldf: required to synchronize an AD LDS instance with AD DS in Windows Server 2003.
      • MSadamschewmaw2k8.ldf: required to synchronize an AD LDS instance with AD DS in Windows Server 2008.

    However, you can create your own ILDF files and store them in %system root%\ADAM folder.

  15. Select the files that you want to import and click Next.
    Figure 4-8

    The Ready to install page appears. The page displays all the selections you made through wizard to create an AD LDS instance.

  16. Verify the selections you made and click Next.The Installing AD LDS page appears displaying the progress of AD LDS instance creation. The Completing the Active Directory Lightweight Directory Services page appears.
  17. Click Finish. The AD LDS instance is created and is ready to use.

The Active Directory Domain Services (AD DS) provides directory services that enable an enterprise administrator to mange a huge network centrally and securely. The network might span a building or multiple geographical locations around the world.

With the introduction of Identity and Access (IDA) technology in Windows Server 2008 Active Directory (AD), the security of the system has increased with the decrease in operational cost. The IDA solution has greatly helped in deepening the electronic relationships of a company with its customers and partners. It enables a company to successfully protect its infrastructure centrally that includes files, emails, applications and databases.

The IDA solution is especially designed for enterprise networks to manage the identities and relationships that make up network environments. Below given are some important features of IDA:

The components of IDA are: