You can manually modify the issuing server settings after deploying your server. The configuration of root CA involves certain settings to be finalized. You need to create a certificate revocation configuration and personalize certificate templates according to your requirements and the configure enrollment and issuance options.
For example, if you want to use EFS to protect data, then you need to configure certificates to be used for EFS. If you want to use wireless network then you need to configure wireless certificates and if you want to use smart card then you need to configure certificates to be used for smart cards.
Although the default settings work fine for the root CA that you have installed, it is advised to review all important settings before continuing.
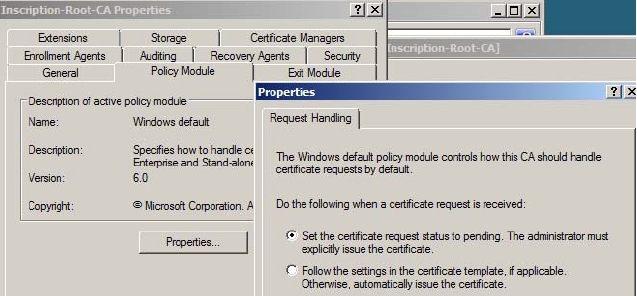
Right-click the root CA and select Properties from the menu that appears. The properties window of the Root CA appears.
The General tab contains the View Certificate button that allows you to see the Details of the root CA certificate. The Policy Module tab allows you to define whether certificate requests should be processed automatically or manually. Click the Properties button to Set the certificate request status to pending option, as shown in Figure 7-6. For root CA, you should set the certificate request status to pending to ensure that you can manually issue the Issuing CA certificate request later on.
Figure 7-6
The Exit Module tab allows you to define whether you want to publish certificates to the file system or not. The Extensions tab allows you to define the CDP and AIA parameters. On the root CA, only allow publication to local file system and http. If you are using OCSP, enable Include in the online certificate status protocol (OCSP) extension.
The Storage tab allows you to set the storage space for the data of the CA For a standalone root CA, this will be a location on a disk. For an Enterprise root CA, this will be AD. The Certificate Managers tab allows you to delegate access to some specific templates and Enrollment Agents and Recovery Agents tabs are only supported on Enterprise CA. On the Auditing tab you should select all the events for auditing.
The Security tab allows you to define the Read, Issue/Manage Certificates, Manage the CA and Request Certificates permissions. For the root CA, you should limit the number of people having access to this CA.
After you configure or verify all the settings, you need to, restart the certificate services by typing the following command on the command line.
net stop certsvc
net start certsvc
Before issuing any certificate
Before issuing any certificate it is important to verify that all the settings are configured and are working. To verify settings, you can publish a certificate by right-clicking the Revoked Certificates node and then selecting All Tasks –> Publish. Verify that the certificate file is created under C:\certs\cdp
The backup technology in Windows Server 2008 also known as Windows Server Backup (WSB) has improved over the previous versions of Windows Server. It no more includes archive bit, full backup, or files based backup. The new backup technology of Windows Server 2008 performs an image based backup because it uses Volume Shadow Copy Service (VSS) for backup. Because the backup is a selective image, it is fast as compared to file-based backups in previous Windows Server versions. This is because the overhead of opening and closing each file to be backed up is not required.
The image backup does not allow blank space, page file, hibernate file, and certain folders to be backed up. The resulting backup file is a .VHD file. In Windows Server 2008 the backup can be taken for entire volumes and individual files and directories cannot be selected for backup. In addition, you can only select local volumes to backup and not the network shares. The WSB allows you to backup the System State Data, data that includes server configuration, and Ntds.dit directory store. All successive backups after the normal backup become fast because only the changed blocks are backed up.
All backups appear full even though only differential backup is taken. The backup restores are also fast because you don’t have to restore file from a combination of multiple backups such as Full + Incremental + Incremental. You can restore specific files from a folder or all the contents of a folder from a backup. You can also backup and recover other VSS applications such as SQL Server 2005 and Exchange Server 2007 because the entire backup is based on the VSS.
Another bonus with Windows Server 2008 backup is the automatic disk space management which ensures that you never run out of disk space because of backup. This is because previous versions of backups are automatically discarded as the backup device fills up. However, a system state backup is not incremental. Therefore, each system state backup requires a similar amount of space.
The WSB does not allow backing up to tapes. You can create backup images on hard disk drives, external USB drives, network shares, or recordable DVDs. The backup feature is not installed in Windows Server 2008 automatically. You need to install the Windows Server Backup, Command-line Tools, and Windows PowerShell items to use backup feature. These items are available in the Add Features Wizard that can be invoked through Server Manager.
To perform backups of AD DS, you must be a member of the Administrators group. However to perform unscheduled backups, you can be a member of the Backup Operators group. To restore a domain controller, you need the Directory Services Restore Mode (DSRM) password.
You can perform an interactive full system backup through command line tool
Wbadmin.exe. To invoke the command, you need to type:
Install Windows Server Backup through Server Manager
Click Start-> Administrative Tools-> Windows Server Backup. The Windows Server Backup window appears, as shown in Figure 6-1.
Click Backup Once from the Action menu. Figure 6-1
The Backup Once Wizard appears.
Click Different option from the Backup options page and then click Next. The Select backup configuration page appears, as shown in Figure 6-2.
Click Full server option if you want to take a complete backup. This is usually recommended if you are taking backup for the first time and then click Next. Figure 6-2
The Specify destination type page appears.
Click Local drives to take the backup on the local drive or Remote shared folder to take backup on a network share and then click Next. The Select backup destination page appears if you have selected Local drives else Specify remote folder page appears.
Select a drive and then click Next on the Select backup location page or provide shared folder information and then click Next on the Specify remote folder page as per your choice of the destination type.If you have specified the remote folder as a backup destination then provide the path to the shared folder in the Type the path to the shared folder field and then select Do not inherit or Inherit option from Access Control field.The Inherit option provides access to all the people who have access to that folder and do not inherit will allow access to the backup folder to users who can provide user credentials to that folder that match the credentials set in the Provide user credentials for Backup dialog box that appears next.The Specify advanced option page appears.
Select VSS copy backup (recommended) option and then click Next. The Confirmation page appears.
Review the selections that you made for backup and then click Backup. The backup process is started.
Click Close at any time option. This will run the backup in the background and will allow you to view backup progress at any time during the backup. The wizard closes automatically when the backup is complete.
Schedule the Backup
To ensure that you always have the latest backup copy of your AD DS directory, you
need to:
Install Windows Server Backup through Server Manager
Click Start-> Administrative Tools-> Windows Server Backup. The Windows Server Backup window appears.
Click Backup Schedule from the Action menu. The Getting Started page of the Backup Schedule Wizard appears, as shown in Figure 6-3.
Click Next. The Select backup configuration page appears.
Click Full Server (recommended) option and then click Next. The Specify backup time page appears.
Specify the backup time on which you want to schedule the backup. You can schedule a backup once a day or more than once a day.
Click Next. The Select destination disk page appears.
Select your destination disk, and then click Next.
Click Yes to confirm that the destination disk will be reformatted. The Label destination disk page appears.
Click Next. Confirmation page appears.
Click Next. The Summary page appears.
Click Finish and then click Close. Figure 6-3
The data that you have backed up can only be recovered back through restore. Windows
Server backup in Windows Server 2008 has three recovery modes:
Full server recovery: This mode recovers the full system on the same server or another server. It not only restores back the system state but reformats and repartitions all disks that are attached to the server. However, you need to be cautious while performing the full server recovery because any existing data that is not included in the backup will be deleted when the recovery process is completed including the volumes that are not included in the backup.
System state recovery: This recovery mode is also known as nonauthoritative restore of a domain controller. You perform this restore to get back the directory service to a previous date state when the backup was created. After this restore, all the domain controllers of the AD DS domain are also updated with changes that have occurred since the time that the backup was created through Active Directory replication.
File/folder recovery: This recovery mode is also known as authoritative restore. It is used to recover objects and containers that have been deleted from AD DS.
Full System Recovery or System State Recovery
To perform full server recovery of a domain controller or to perform a nonauthoritative
restore, you need to:
Insert the Windows Server 2008 installation DVD and follow the installation steps till the Install now screen appears.
Click Repair your computer. The System Recovery Options page appears.
Clear the selected operating systems if any and then click Next.
Click Windows Complete PC Restore under Choose a recovery tool.
Select the location of the backup on the Select the location of the backup page and then click Next.Alternatively, if the backup is stored on a network shared folder, click Advanced, and then click Search for a backup on the network.
Click Yes to confirm.
Type the path of the network folder in Network Folder and then click OK.
Type the appropriate credentials to restore the backup, and then click OK.
Click the location of the backup and then click Next on the Select the location of the backup page.
Select the backup to restore, and then click Next.
Choose how to restore the backup page by selecting the Format and repartition disks check box, if you want to replace all data on all volumes. Alternatively, click Exclude Disks to prevent volumes that are not included in the restore from being deleted and re-created and then select the check box for the disks that you want to exclude, and then click OK.
Click Next and then click Finish.
Select the I confirm that I want to format the disks and restore the backup check box, and then click OK.
You can also performing a full server recovery of a domain controller by using the
command line. To use the command line, you need to:
Follow the steps from 1-3 of the procedure given above
Click Command Prompt under Choose a recovery tool.
Type diskpart, and then press ENTER at the Sources prompt.
Type list vol, and then press ENTER at the Diskpart prompt.
Select the volume that contains the full server backup that you want to restore.
Type exit, and then press ENTER.
Type the following command at the Sources prompt, and then press ENTER:
wbadmin get versions -backupTarget:<targetDrive>: -machine:<BackupComputerName>
Where:
<targetDrive>: is the location of the backup that you want to restore and
the <BackupComputerName> is the name of the computer where you want to recover the backup. Use this parameter, if the backup is stored on
a remote computer.
Authoritative Restore
To perform Authoritative restore, you need to:
Start the domain controller in Directory Services Restore Mode DSRM
Start the elevated command prompt by right-clicking the command prompt and then selecting Run as Administrator option.
Restore the desired backup by piping the snapshots displayed into a text file by typing the command:Ntdsutil “activate instance NTDS” snapshot “list all” quit quit > snapshot.txt
Locate the GUID of the backup that you need to restore in the snapshot.txt file
Mount the snapshot by typing the snapshot GUID in the following command:Ntdsutil activate instance NTDS snapshot mount <GUID> quit quit
Auditing is an important security feature that allows you to log events about specific activities into Windows security logs. You can then monitor these events to understand the issues that need your attention. An audit policy allows you to find out the success or failure of audited events such as logon account, object access or directory service change events. Auditing involves three management tools: audit policy, audit settings on object, and the security log.
To audit file or folder access you must add auditing entries to the SACL (System Access Control List) of the files and folders and then define Audit Object Access Policy setting. The SACL of an Active Directory object specifies things such as the account that will be tracked, the type of access that will be tracked, such as read, create, and modify, and success or failure access to the object.
You can configure permissions and auditing on a folder following the steps given below:
Create a group called grp_notepad so that you can use it to deny access to a folder.
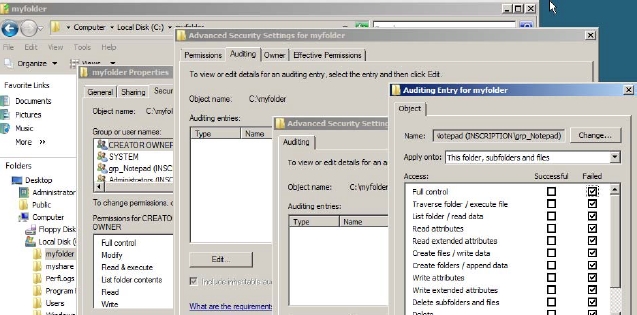
Right-click the folder in which you want to enable auditing and select the Properties option to see the Properties window
Click Security tab and add a group grp_notepad and deny Full Control permission to the group.
Click the Advanced button and then click Auditing tab from the Advanced Security Settings window of the folder, as shown in Figure.
Click edit and then add the grp_notepad group to the window that appears and click OK.
Select the Failed checkbox next to the Full control field in the Audit Entry dialog box that appears and click OK, as shown in Figure 5-28:
Figure 5-28
To enable audit policy for the default security policy on a domain controller, you need to:
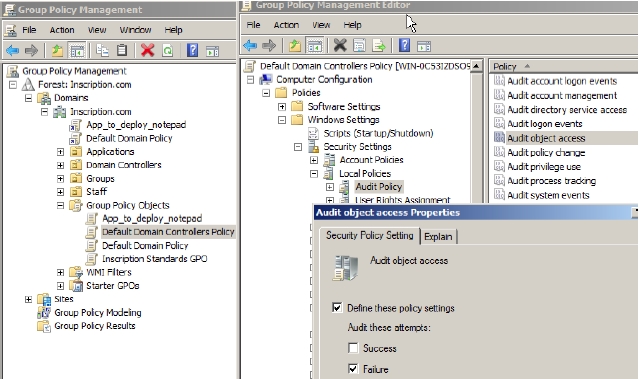
Right-click Default Domain Controllers Policy under the Group Policy Objects container, and then click Edit. The GPME appears.
Expand Computer Configuration, expand Windows Settings, expand Security Settings, expand Local Policies, and then click Audit Policy.
Double-click Audit object access in the right pane.
Select Define these policy settings opting in the Audit object access Properties window that appears, as shown in Figure 5-29.
Select Failure check box and then click OK to close the console.
Type gpupdate at the command prompt of a server and then press ENTER. The policy will be updated. Figure 5-30
You need to then finally evaluate the resulting audit entries in the security log. Windows Server 2008 provides more detailed auditing of changes to objects in AD. To enable this category of auditing you need to use Auditpol.exe.
The account policies such as password and lockout policies have greatly improved in Windows Server 2008. Windows Server 2003 offered only one password and account lockout policy for all users in the domain under the Default Domain Policy. Due to which, it was not possible to set different password and account lockout settings for different sets of users.
However, Windows Server 2008 allows you to create multiple password policies for different set of users. The password policies in Windows Server 2008 are called Fine grained password and lockout policies. Although these policies appear similar to the Password Policy and Account Policy node of GPO, they are not implemented as a part of GPO. Instead, two separate object classes have been added to the AD DS for the same. These object classes are, Password Settings Container (PSC) and Password Settings.
The Password Settings Container is created by default under the System container in the domain and stores the Password Settings objects (PSOs) for that domain. You can create one or more PSO in a domain. Each PSO contain a complete set of password and lockout policy settings. A PSO can be linked to one or more security groups or users. To implement fine grained policies in your domain, the functional level of your domain must be Windows Server 2008.
The high level steps to configure the fine grained password policy include create a PSO, configuring the PSO options, assign the PSO to a user account or a global security group, and finally confirming the settings.
To configure the fine grained password policy, you need to:
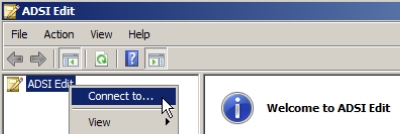
Right-click ADSI Edit and then select Connect to from the menu that appears, as shown in Figure 5-23: Figure 5-23
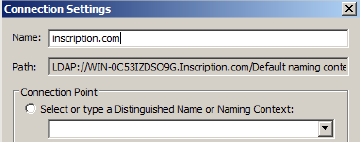
Type Inscription.com in the Connection Settings dialog box that appears, as shown in Figure 5-24: Figure 5-24
Expand the domain and then expand DC=Inscription, DC=com.
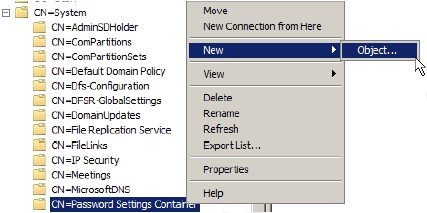
Expand CN=System and then
Right-click CN=Password Settings Container and then select New->Object, as shown in Figure 5-25: Figure 5-25
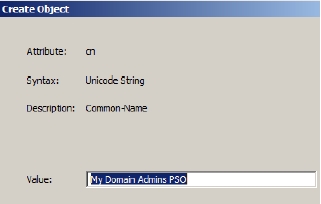
The Create Object dialog wizard appears, as shown in Figure 5-26:
Figure 5-26
Keep providing the settings as shown in the table and then keep clicking Next
Attribute
Value
Quick explanation
Cn
My Domain Admins PSO
This is the name of the policy.
msDS-PasswordSettingsPrecedence
1
This PSO has highest precedence
msDSPasswordReversibleEncryptionEnabled
False
The password is not stored with reversible encryption.
msDS-PasswordHistoryLength
32
The user cannot use any of the last 32 passwords
msDS-PasswordComplexityEnabled
True
complex password is ensured
msDS-MinimumPasswordLength
16
accounts password should be minimum 16 number of characters
msDS-MinimumPasswordAge
1:00:00:00
User cannot change the password before one day
msDS-MaximumPasswordAge
45:00:00:00
Must change password after every 45 days
msDS-LockoutTreshold
8
The number of failed attempts before the user account will be locked
msDS-LockoutObservationWindow
0:01:00:00
After 1 hr the counter for failed attempts will be reset
msDS-LockoutDuration
1:00:00:00
If account will be locked it will be locked for one day
Click More attributes on the last screen of the wizard.
In the Edit Attributes box type CN=Admins,CN=Users,DC=inscription,DC=com and click OK and then click Finish.You need to now apply the PSO to users or groups
Open the Active Directory Users and Computers snap-in and ensure that the Advanced Features is enable in the View menu
Go to \domain node\System\Password Settings Container and then right-click the PSO appearing in the details pane.
Select Properties from the menu that appears.
Click the Attribute Editor tab in the PSO Properties window that appears, as shown in Figure.
Select the msDS-PsoAppliesTo attribute, and then click Edit, as shown in Figure 5-27. Figure 5-27
Provide the distinguished name in the Multi-valued String Editor window that appears as CN=Admins,CN=Users,DC=inscription,DC=com.
The example above have added a global security group named “Admins” with the distinguished name of “CN=Admins,CN=Users,DC=inscription,DC=com”.Every user account that is a member of this group will now be affected by this new password policy instead of the password policy defined in the Default Domain Policy.
The Group Policy Software Installation (GPSI) feature allows you to deploy software to multiple users. The software can be made available in two ways: One of the ways is that as soon as the software is deployed the users can access the software from any computer and the other way is to deploy the application to computers. The users logged in can use the applications. With the use of GPSI the applications can be deployed without the use of any technical support representative. The applications can be updated, maintained and deleted through the GPO as per the needs of the organization.
The applications can be deployed using Windows Installer Packages. These files are available with .msi extension. The .msi files contain explicit instructions regarding the installation and removal of the application. To update the applications the patch files called .msp files are used.
As mentioned above, the applications can be deployed in two ways, these ways are:
Assigning Application: When an application is assigned to users through GPSI, the assignment takes effect as soon as the users log on to any of the systems the next time after the assignment. When the users log in, they can see that the new application added to the Start menu and / or to the desktop. However, the application they see on their computer is not actually been installed to their systems. The software is not actually installed until the user attempts to use it for the first time. When the application is assigned to the computer then the application is installed as soon as the computer boots up the next time.
Publishing Application: Publishing an application doesn’t actually install the application, but rather makes it available to users. As soon as the user logs in, they cannot find the applications on their start menu or the desktop. Instead the application appears as an available application for the users to install using the Add Remove Programs from the Control Panel on a Windows XP system or in Programs and Features on a Windows Server 2008 and Vista systems.
Deploying an Application through GPSI
To deploy
To deploy an application through GPSI, you need to:
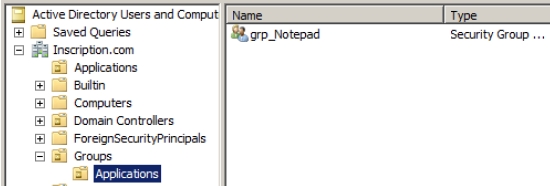
Create a First level OU called Applications and then create a Global security group under it called grp_Notepad using Active Directory Users and Computers snap-in, as shown in Figure 5-15. The users of only this group will be able to get the deployed application. Figure 5-15
Ensure that you have the application available to you on your hard disk that you want to deploy. For testing purpose, you can download XML_Notepad application from the URL www.microsoft.com\downloads.
Provide Read and Execute permission on the folder in which you have kept the installation package for the software to be installed to the grp_Notepad group.
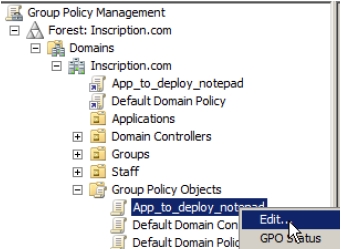
Open the Group Policy Management snap-in and then create a new group policy object called App_to_deploy_notepad.
Right_click the App_to_deploy_notepad GPO and then select Edit from the menu that appears, as shown in Figure 5-16: Figure 5-16
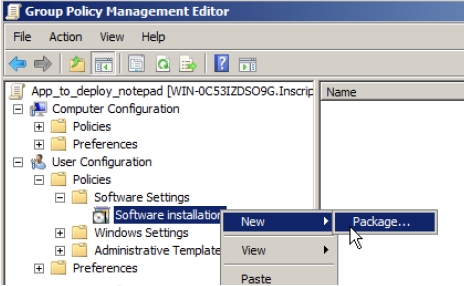
Expand the Software Settings node under the User Configuration node in the Group Policy Management Editor that appears, as shown in Figure 5-17
Right_click the Software Installation node and then select New->Package Figure 5-17
Provide the path of the software installation folder in the Name field of the Open dialog box that appears and click Open. In this example provide the path for the XML_Notepad that you have downloaded.
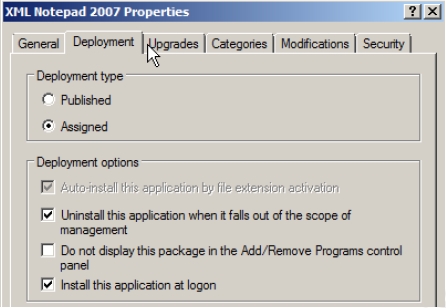
Select Advanced in the Deploy Software dialog box that appears.The Properties window of the deployment package appears, as shown in Figure 5-18.
Click Deployment tab and then select Assigned.
Select Install this application at logon and then select Uninstall this application when it fails out of the scope of management options.
Click OK and then close the Properties window and the Group Policy Management Editor window Figure 5-18
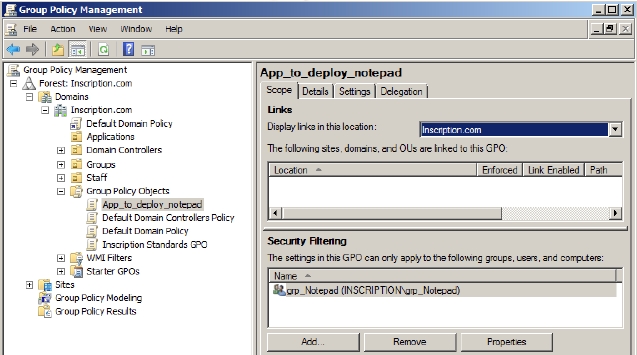
Select the App_to_deploy_notepad GPO from the Group Policy Objects container in the Group Policy Management console, as shown in Figure.
Click on the Scope tab and remove Authenticated users from the Security Filtering list.
Add grp_Notepad group that you have created to the Security Filtering list, as shown in Figure 5-19: Figure 5-19
The GPO is now ready to be implemented. It cannot function until it is linked to a domain. So you now need to link it to a domain
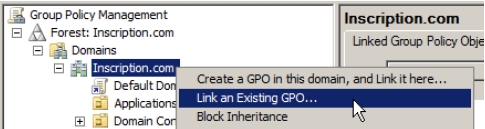
Right-click the domain name and then select Link an Existing GPO option from the menu that appears, as shown in Figure 5-20: Figure 5-20
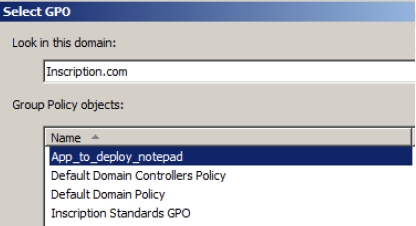
Select the App_to_deploy_notepad GPO from the Select GPO dialog box that appears, as shown in Figure 5-21: Figure 5-21
The linked GPO appears in the list of Linked Group Policy Objects for the domain as shown in Figure 5-22.
Figure 5-22
The software application is now assigned to the user of group grp_Notepad. As soon as the users of this group will logon to any of the computers in the domain the application will be installed when the users will try to use it.
The AD FS is usually deployed in medium to large organizations that use multiple domains and have computers that run various operating systems. AD FS allows you to create a highly secure, extensible and Internet-scalable solution that can operate across both Windows and non-Windows multiple platforms.
AD FS can be installed if the domain runs either AD DS or AD LDS. It is tightly integrated with Microsoft Office SharePoint Server 2007 and AD RMS. AD FS is integrated with AD RMS in such a way that organizations can collaborate with external partners using the existing federated trust relationship.
Click Next on the first page of the Add Roles Wizard that appears.
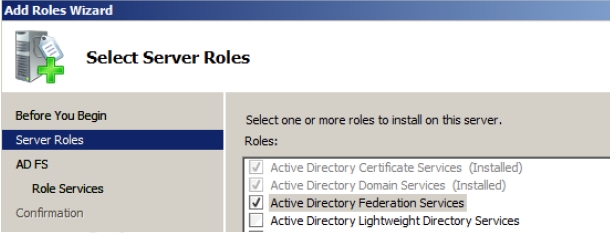
Click Active Directory Federation Services option on the Select Server Roles page, as shown in Figure 4-32: Figure 4-32
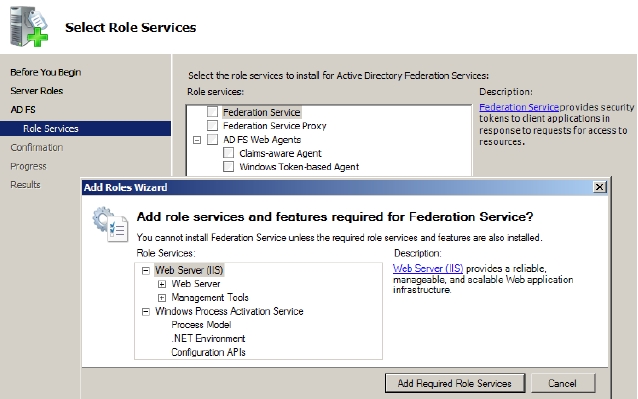
Select the Federation Service check box on the Select Role Services page and then click Add Required Role Services if the additional Web Server (IIS) or Windows Process Activation Service role services are not installed already, as shown in Figure 4-33. Figure 4-33
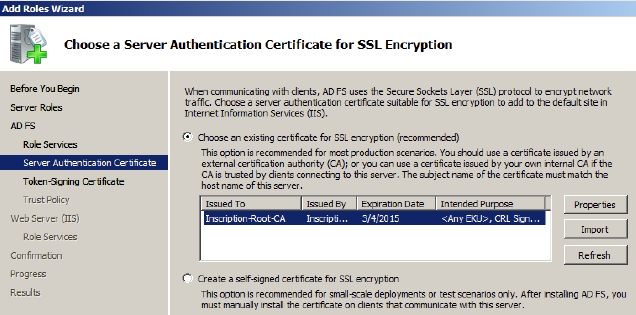
Select the certificate displayed on the Choose a Server Authentication Certificate for SSL Encryption page that appears and then click Next, as shown in Figure 4-34 . Figure 4-34
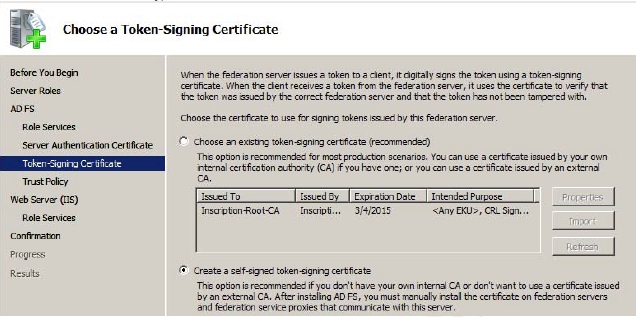
Click Create a self-signed certificate for SSL encryption option and then click Next. The Choose a Token-Signing Certificate page appears.
Click Create a self-signed token-signing certificate option and then click Next, as shown in Figure 4-35: Figure 4-35
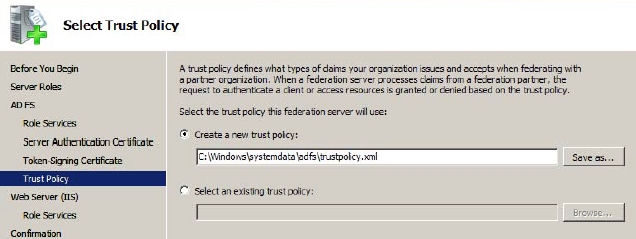
The Select Trust Policy page appears, as show in Figure 4-36.
Click Create a new trust policy and then click Next twice. Figure 4-36
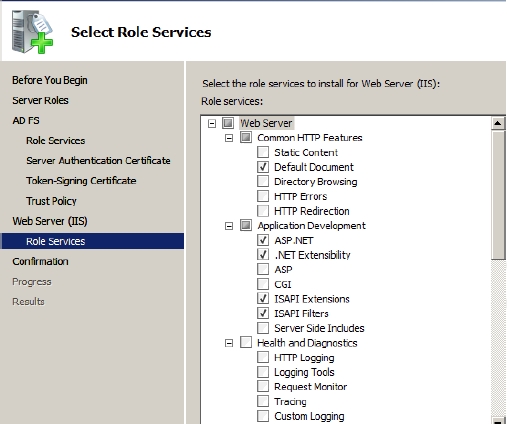
The Select Role Services page appears, as shown in Figure 4-37.
Accept the default values and then click Next. The Confirm Installation Selections page appears. Figure 4-37
Click Install. The Installation Results page appears.
Verify the installation and then click Close.
Before you configure AD RMS, you need to:
Install the AD RMS server on a Windows Server 2008 member server of the same Active Directory Domain..
Install Windows Server 2008 Enterprise edition on two member server of the same domain. These servers will host AD RMS policy servers..
Install Windows Server 2008 Enterprise edition on a member server of the same domain. This server will host SQL Server 2005 as a database server.
Reserve a few URLs for the AD RMS cluster that neither include a computer name nor use localhost and will be available throughout the lifetime of the AD RMS installation. Use different URLs for internal and external computers.
Create some domain user accounts and configure E-mal addresses for them in AD DS.
Create a standard user account as a service account and add it to Local Administrators group
Create a domain based service account and assign the Generate Security Audits user right to it.
Create a domain based user account that has local administrator privileges for installing AD RMS. Ensure that the account is not on the smart card. If the account needs to be used to generate server connection points then it must be a member of Enterprise Admins group and if it needs to use external database then it should be a member of System Administrators role on DB server.
Obtain secure sockets layer (SSL) certificate for the AD RMS cluster.
Store the cluster key in the AD RMS configuration database.
Create custom DNS alias (CNAME) record for the AD RMS cluster URL and for the database server.
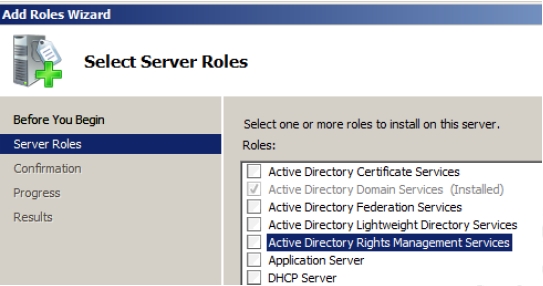
Click Next on the first page of the Add Roles Wizard that appears.
Select Active Directory Rights Management Services option on the Select Server Roles page, as shown in Figure 4-29. Figure 4-29
Click Next. The role services page appears.
Ensure that Web Server (IIS), Windows Process Activation Service (WPAS), and Message Queuing options are selected and then click Add Required Role Services.
Click Next. the AD RMS introduction page appears
Verify that the Active Directory Rights Management Server is selected on the Select Role Services page and click Next.
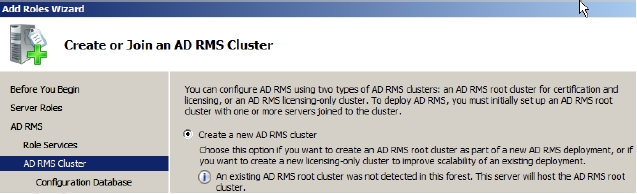
Select Create a new AD RMS cluster option and click Next on the Create or join an AD RMS Cluster page that appears, as shown in Figure 4-30. Figure 4-30
Select the Use a different database server option and then browse the name of the computer that is hosting AD RMS databases and then click Next.
Click Select to locate the database server and type the name of the database server, click Check names and then click OK.
Choose the appropriate database instance from the Database Instance dropdown, click Validate and then click Next.
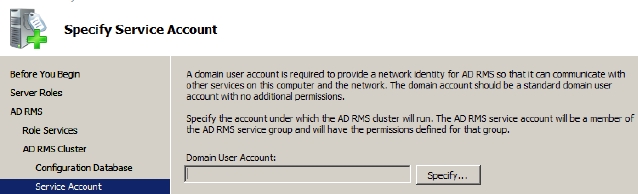
Click Specify and then type the domain user account and password that should be used as the AD RMS service account on the Specify Service Account page that appears, as shown in Figure 4-31.
Click OK, and then click Next. Figure 4-31
The Configure AD RMS Cluster Key Storage page appears.
Ensure that the Use AD RMS centrally managed key storage option is selected, and then click Next. The Specify AD RMS Cluster Key Password page appears.
Type a strong password in the Password field, rewrite the password again in the Confirm password field, and then click Next. The Select AD RMS Cluster Web Site page appears.
Select Default Web Site or select the web site where the AD RMS Web services will be installed and then click Next. The Specify Cluster Address page appears.
Select the Use an SSL-encrypted connection (https://) option.
Type the FQDN name of the AD RMS cluster in the InternalAddress field, and then click Validate. If validation succeeds, the Next button becomes active.
Click Next. The Choose a Server Authentication Certificate for SSL Encryption page appears.
Select the Choose an existing certificate for SSL encryption (Recommended) option, select the appropriate certificate or click Import to import the certificate, and then click Next. The Server Licensor Certificate page appears.
Provide a name that helps you identify the AD RMS cluster in the Friendly name field, and then click Next. The Register AD RMS Service Connection Point page appears.
Ensure that the Register the AD RMS service connection point now option is selected, and then click Next. This action will register the AD RMS service connection point (SCP) in AD DS. The Introduction to Web Server (IIS) page appears.
Click Next. The Select Role Services page appears.
Accept the defaults and click Next. The Confirm Installation Selection page appears.
Review your choices and then click Install.
Click Finish when the installation completes.
Log off from the server, and then log back again. Update the permissions granted to the logged on user account.This user account will automatically become a member of the AD RMS Enterprise Administrators group.
An RODC contains a read only copy of all the objects in the domain to allow local authentication of users in each branch office. It performs replication with the domain controller at the main site to keep its data updated. RODC also reduces the physical security threat for the domain controller at the branch office because it does not keep a copy of confidential attributes (secrets) such as password-related properties on it. In case the security is compromised, much harm is not caused.
Before installing the Read Only Domain Controller in your forest/domain, you need to:
Ensure that the Forest functional level of the domain/forest is Windows Server 2003 or higher. If the domain has any Windows Server 2003 domain controller running in it. Run adprep / rodcprep. This command prepares the domain controllers that are running Windows Server 2003 for replication of DNS application directory partitions.
Ensure that at least one writable domain controller is running Windows Server 2008 to ensure that the RODC is able to establish a connection with writable Windows Server 2008 to perform replication.
Install RODC
You can install RODC on a full installation or the core installation of Windows Server 2008 on a member server in the domain.
To install RODC on a full installation of Windows Server 2008, you need to:
Ensure that your Primary Domain Controller is switched on.
Log on to the Windows Server 2008 server that you want to configure as RODC with domain administrative credentials.
Click Start->Run and type dcpromo.A window informing you about the installation of Active Directory Domain Services binaries appears. After this installation is complete the Active Directory Domain Services Installation Wizard appears.
Click Next.
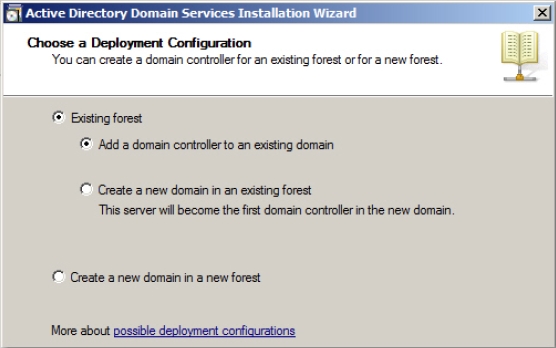
Click Next on the Operating System Compatibility page that appears.The Choose a Deployment Configuration page appears. The page allows you to create a new domain or a forest or add new domain controllers or new domains to the existing forest.
Select Existing forest option and then select Add a domain controller to an existing domain option under it and click Next, as shown in Figure 4-9.The RODC is always added to the existing forest in the existing domain. Figure 4-10
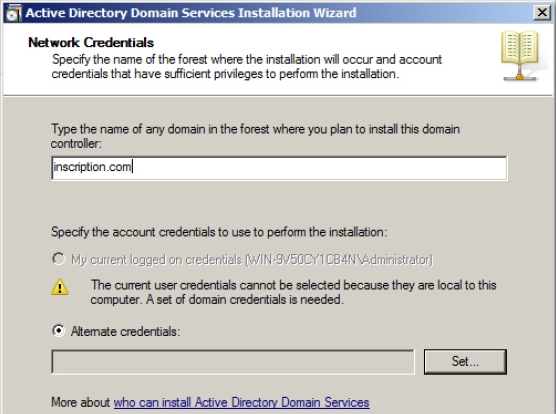
The Network Credentials page appears, as shown in Figure 4-11.
The page allows you to provide the name of the forest/domain where you want to add the RODC.
Provide the name of the domain in which you want to add RODC in the Type the name of any domain in the forest where you want to plan to install this domain controller field.
Select Alternate credentials option and then click Set. Figure 4-11
Provide your domain administrative credentials in the Username and the Password fields respectively and click OK on the Windows Security page that appears.The username that you have provided along with the domain name appears in the Alternate credentials field.
Click NextThe Examining Active Directory forest window appears. The window tries to establish a connection between the domain controller and this server with the account credentials that you had provided in the previous step so that RODC can be installed on this server.
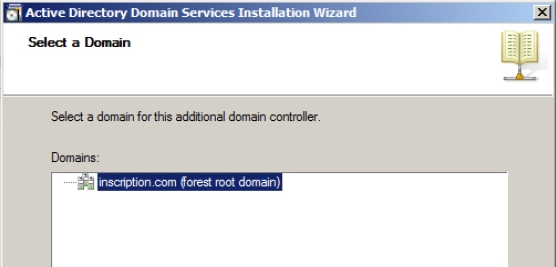
Select the domain for this domain controller and click Next on the Select a Domain page that appears, as shown in Figure 4-12. Figure 4-12
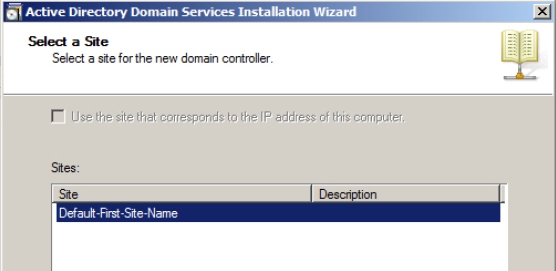
The Select a Site page appears.
Select the site that you created for the new branch office for which you want to install the RODC.If no site is created then the Default-First-Site-Name option appears, as shown in Figure 4-13. Figure 4-13
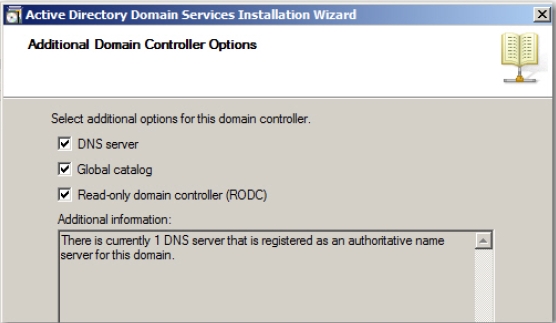
The Additional Domain Controller Options page appears, as shown in Figure 4-14.
Select Read-only domain controller (RODC) option from the Select additional options from the domain controller field.
Verify that DNS Server and Global catalog options are also selected. Figure 4-14
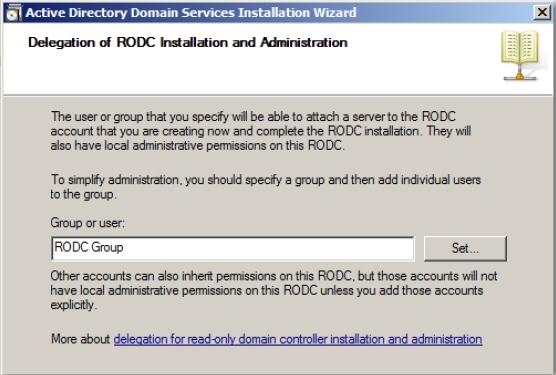
The Delegation of RODC Installation and Administration page appears, as shown in Figure 4-15.
The page allows you to specify the name of a user or group who will have local administrative rights on this RODC to attach servers to it.
Provide the user name or the group name in the Group or user field optionally and click Next. Figure 4-15
The Location for Database, Log Files, and SYSVOL page appears.
Verify/modify the locations of Database folder, Log files folder, and SYSVOL folder in their respective fields and click Next.The Directory Services Restore Mode Administrator Password page appears. The page allows you to set a password that will be used when this domain controller will be started in the Directory Services Restore mode to restore the Directory services.
Provide a strong password in the Password field and retype the password in the Confirm password field.
Verify the selection you have made up till now to install RODC on this server and click Next on the Summary page appears.The Active Directory Domain Services Installation Wizard page appears displaying the progress of the installation.
Select Reboot on completion checkbox and click Finish.
Creating an AD LDS instance
To create an AD LDS instance, you need to:
Install AD LDS on your server, using Add Roles Wizard through Server Manager.You can now start using AD LDS service by creating an AD LDS instance for the desired application. To create an AD LDS instance, you need to:
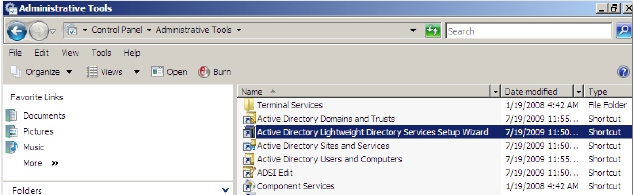
Select Active Directory Lightweight Directory Services Setup Wizard tool, as shown in Figure 4-1. Figure 4-1
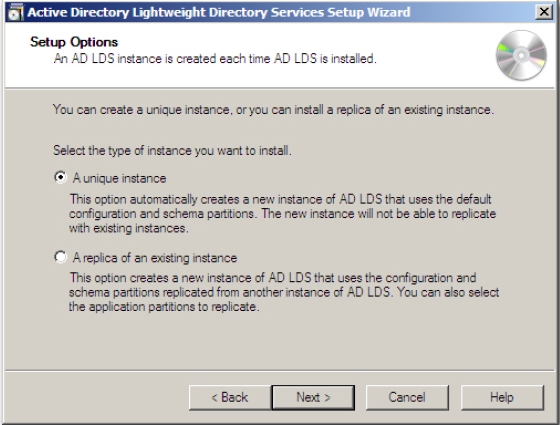
Click Next on the Active Directory Lightweight Directory Services Setup Wizard that appears.The Setup Option page of the wizard appears, as shown in Figure 4-2. The page provides you option to create A unique instance or A replica of an existing instance.
Select A unique instance option and click Next. Select the mentioned option because you are creating your first AD LDS instance in this example. Figure 4-2
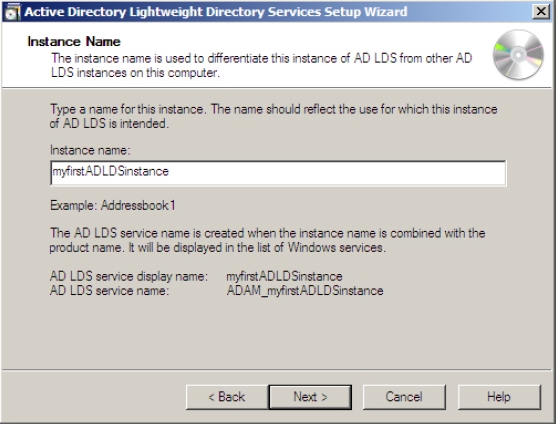
The Instance Name page appears, as shown in Figure 4-3.
Provide a meaningful instance name in the Instance name field and click Next.A meaningful instance name allows you to identify an instance that is tied to an application on the local computer. It also allows you to identify the associated files and the service that supports the instance. Figure 4-3
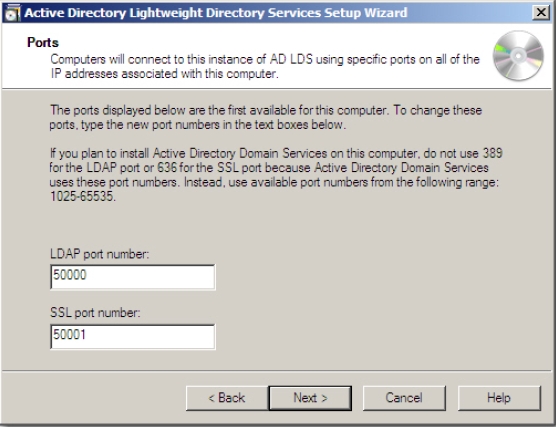
The page displays the first available communication ports that AD LDS instance would use for communication on this computer. Usually port 389 is provided by default in LDAP port number field and port 636 is provided in SSL port number field. These ports are the default ports for AD DS service also.
Because both these services use the same ports, Microsoft recommends using different server computers for both these services. However, there is no such restriction. If you want to use both the services on the same computer, you need to specify different ports for both these services.
If the wizard detects that AD DS is already installed on server and ports 389 and 636 are already in use, it proposes first available communication ports starting from 50000. It therefore proposes 50000 and 50001 ports for LDAP port number and SSL port number fields respectively.
Modify the default port numbers to 50000 and 50001 ports for LDAP port number and SSL port number fields respectively if AD DS is not already installed on server but you decide to install it in future else keep the default ports.
Click Next. Figure 4-4
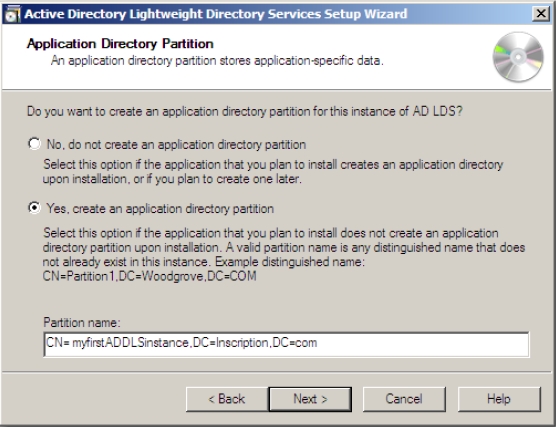
The Application Directory Partition page appears, as shown in Figure 4-5.
The application Directory partitions store Domain Name System (DNS) zones in a data structure in such a way that the data of the different zones can be distinguished for different replication purposes. The application directory partitions are created to control the scope of replication for the zone that is stored in that partition.
The page allows you to specify the name of Active Directory application partition name that you want to use for this instance. You can choose to create a new application partition or decide to proceed without creating a partition. If you decide to proceed without creating a partition you need to manually create a partition after the creation of AD LDS instance. You can use AD LDS administration tools later to create an application directory partition or create an application partition at the time of installing your directory-enabled application and tying it to an AD LDS instance.
You must specify a unique distinguished name for the partition in the following format:
CN=,DC=
The partition name is based on the fully qualified domain name. For example, if the instance name is myfirstADDLSinstance and the server name is Inscription.com, then the partition name would be represented as:
CN= myfirstADDLSinstance,DC=Inscription,DC=com
Specify a unique distinguished name for the partition in the Partition name field and click Next. Figure 4-5
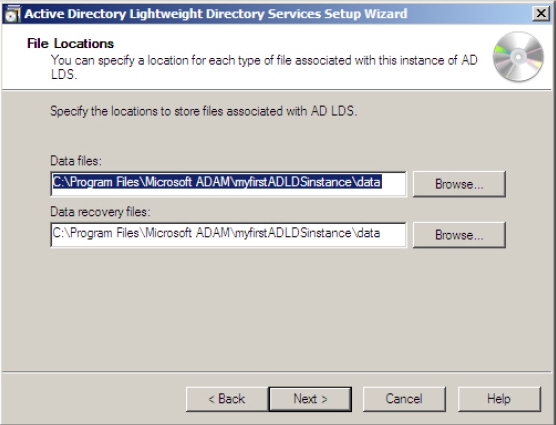
The File Locations page appears, as shown in Figure 4-6.
The page allows you to specify the locations of files associated with this AD LDS instance.
Provide a file location by typing or browsing the location for associated data files in Data files field and for data recovery files in Data recovery files fields respectively and click Next. Figure 4-6
The Service Account Selection page appears, as shown in Figure 4-7.
The page allows you to select a service account that will be used to run this AD LDS instance according to the permissions associated with the selected account. You can use Network service account option if you have to manage just one AD LDS instance. However, if you have many AD LDS instances then it is better to use service account or This account option for each instance
Select the desired account. Provide the credentials of the service account in the User name and Password fields if you choose This account option.
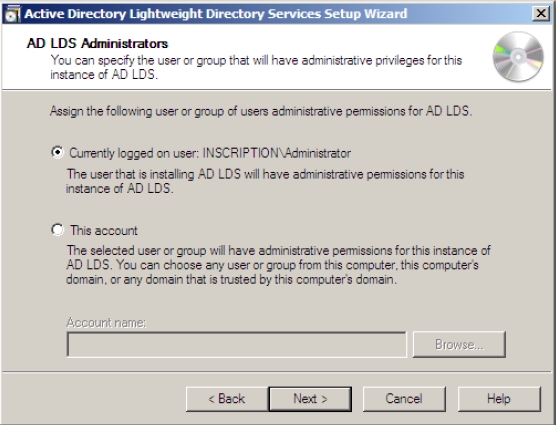
Click Next. The AD LDS Administrators page appears, as shown in Figure.The page allows you to select user account that will administer this AD LDS instance. It is always better to select a group on this page so that a group would have the rights to administer the AD LDS instance. This is because if the personnel change, in a group, members can be added or changed but an individual account is difficult to change.
Select Currently logged on user option if you want the current user to administer the instance. Alternatively, select This account option and Browse the individual account or a group account that you want to use to manage this AD LDS instance.
Click Next. Figure 4-7
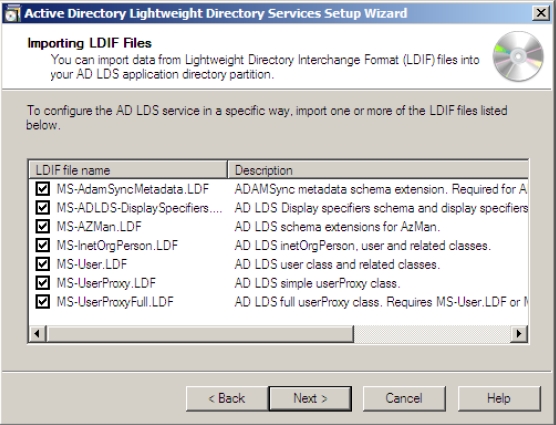
The Importing LDIF Files page appears, as shown in Figure 4-8.
The LDIF files extend the schema of the AD LDS instance. By default the seven LDIF
files are available. These files are:
MS-AdamSyncMetadata.ldf: Required to synchronize data between an AD DS forest and an AD LDS instance through ADAMsync.
MS-ADLDS-DisplaySpecifiers.ldf: Required for Active Directory Sites and Services snap-in operation.
MS-AZMan.ldf: Required to support Windows Authorization Manager.
MS-InetOrgPerson.ldf: Required to create inetOrgPerson user classes and attributes.
MS-User.ldf: Required to create user classes and attributes.
MS-UserProxy.ldf: Required to create a simple userProxy class.
MS-UserProxyFull.ldf: Required to create a full userProxy class.
Besides these seven LDF files, the following LDF files are also available:
MSadamschewmaw2k3.ldf: required to synchronize an AD LDS instance with AD DS in Windows Server 2003.
MSadamschewmaw2k8.ldf: required to synchronize an AD LDS instance with AD DS in Windows Server 2008.
However, you can create your own ILDF files and store them in %system root%\ADAM folder.
Select the files that you want to import and click Next. Figure 4-8
The Ready to install page appears. The page displays all the selections you made through wizard to create an AD LDS instance.
Verify the selections you made and click Next.The Installing AD LDS page appears displaying the progress of AD LDS instance creation. The Completing the Active Directory Lightweight Directory Services page appears.
Click Finish. The AD LDS instance is created and is ready to use.
The AD DS contains a data store called ntds.dit that it uses for identity and management of AD objects. This database file contains directory partitions, which is also called the naming context. Each naming context contains objects of a particular scope and purpose. The major naming contexts are:
Domain: This naming context contains all the objects stored in the domain including users, groups, computers and group policy containers.
Configuration: This naming context contains objects that represent the logical structures or the physical topology of the forest including domain, sites, subnets, and services.
Schema: This naming context defines the object classes and other attributes of the entire directory or the database.
Traditionally the replicas of the domain controllers were the complete replicas but now days, when the replication occurs between domain controllers, the entire directory is not copied; rather some of the naming contexts are copied to other domain controllers. For example the domain naming context is replicated to all the domain controllers within the domain but not to the domain controllers outside the domain. The configuration and schema naming contexts are replicated to all the domain controllers in a forest.
The Active directory also supports Application Directory Partition that stores only the object required by an application or a service. This partition is only a portion of the data store. The good thing about the application partition is that they can be replicated to specific domain controllers because they are not replicated to all the domain controllers by default.
The AD replication ensures that the information on each domain controller in a domain contains the same and consistent information. Although the information may not be exactly the same at any one moment in time because the changes are constantly been made, the replication ensures that all the changes to a partition are transferred to all the replicas of the partition.
The replication topology need not be created manually. It is automatically generated and optimized by an AD component called Knowledge Consistency Checker (KCC) among the domain controllers in the same domain. KCC creates connection objects that connect two domain controllers of different sites that participate in replication. The connection objects can also be created manually to force replication.
The replication can be of two types:
Intrasite replication: Refers to the replication that occurs between the domain controllers on the same site. It is faster as compared to intersite replication because it is done on the objects on the same site. You need to configure site links to configure intrasite replication.
Intersite replication: Refers to the replication that occurs between different sites.
Configure Site Links
The site link is a logical and transitive connection between two or more sites that allow the replication between two sites. KCC uses site links to determine the replication path between the two sites.
To configure site links, you need to:
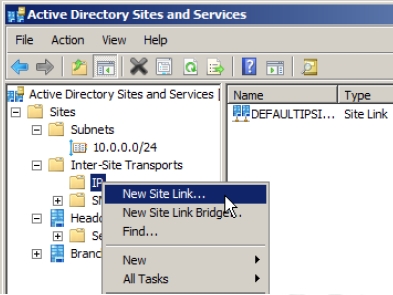
Open Active Directory Sites and Services snap-in by clicking Start- >Administrative Tools-> Active Directory Sites and Services.
Expand Inter-Site Transports folder and right-click either IP or SMTP folder depending on the protocol that you want to use to create a site link
Select New Site Link from the menu that appears, as shown in Figure 3-20: Figure 3-20
The New Object –Site Link dialog box appears, as shown in Figure 3-21.
Provide the name of the site link.
Select the sites that you want to connect from the Sites not in this site link list and click Add
The selected sites will be moved to Sites in this site link list. If the sits already belong to the same link they will automatically appear in the Sites in this site link list.
Click OK.
The site link is created between the selected sites.
After configuring a site link, you can configure its various attributes such as: site link cost, site link replication frequency, site link replication availability, and site replication schedule.
To configure the site link, attributes, you need to:
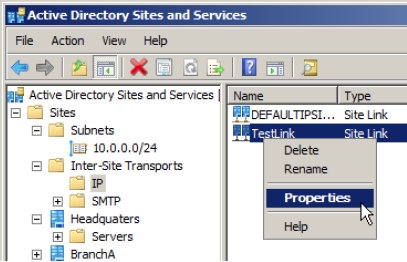
Right-click the site link that you want to configure in the Active Directory Sites and Services snap-in and then select Properties from the menu that appears, as shown in Figure 3-22. Figure 3-22
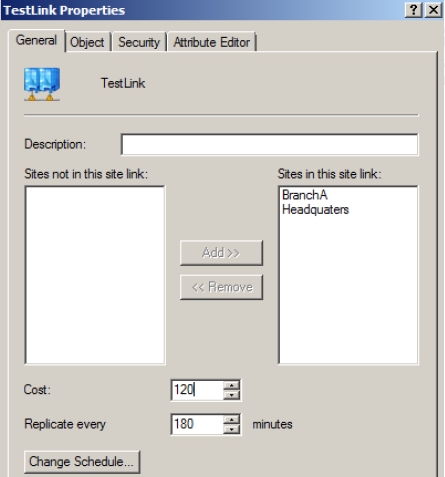
The properties window for the selected link appears, as shown in Figure 3-23.
You can configure the Cost and the Replicate every fields.
The cost refers to the cost of connection with respect to speed of the link. The lower costs are used for fast links. For example, consider you have two connections, T1 line and a dial up connection. So if you configure lower cost for T1 connection, the T1 connection will always be used till it is unavailable. The default cost is 100.
Modify the Cost field as desired.The Replicate every field allows you to configure the replication frequency for the site link. The minimum value for the field is 15 (minutes) and maximum value is 10080 (7 days).
Modify the Replicate every field as desired. Figure 3-23
You can also configure the replication availably schedule for the site link by clicking Change Schedule button on the properties window for the selected link.
Configure Domain Name System (DNS) for Active Directory