Install and Configure an Active Directory Domain Controller
Follow the steps given below to install and configure an Active Directory Domain Controller:
To Install AD DS on the server, you need to:
- Log on to the server with local Administrator account.
- Click Add roles under Customize This Server in the Server Manager window, if it opens automatically.Alternatively, you can click Start-> Settings->Control Panel-> Administrative Tools- >Server Manager and then right-click the Roles node and select Add Roles. The Add Roles Wizard appears.
- Verify the requirements to add roles on the server and click Next. The Select Server Roles page appears.
- Select Active Directory Domain Services option from the Roles field and click Next. The Active Directory Domain Services page appears. The page provides you all the information about AD DS that you may need to know before installing and using this service.
- Click Next. The Confirm Installation Selection page appears.
- Click Install. The Installation Progress page appears. After the installation is complete, the Installation Results page appears
- Click Close.
- Type dcpromo.exe in the Run dialog box. The Active Directory Domain Services installation Wizard appears.
- Click Next. The Operating System Compatibility page appears. The page provides you information about Windows Server 2008 compatibility with older versions of Windows.
- Click Next. The Choose a Deployment Configuration page appears.The page provides you options to use the existing forest and create a new domain or add a domain controller to it or create a new domain in a new forest.
- Select Create a new domain in a new forest option and click Next, as shown in Figure 3-1.The first domain created in your forest becomes the forest root domain. You can keep this existing domain as a forest root domain or create a dedicated forest root domain in a multidomain scenario. If you have a single domain forest then the forest root domain will contain all the users, groups, and resources. However, if you have a multiple domain forest and you create a dedicated forest root domain, then it will contain only forest administration accounts.
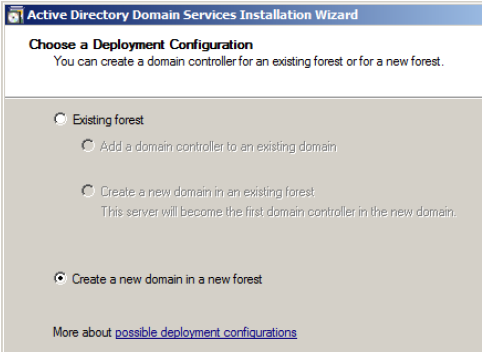
Figure 3-1 - Type the complete name of the forest that you are creating in the FQDN of the forest root domain field on the Name the Forest Root Domain page that appears, as shown in Figure 3-2.
- Click Next.
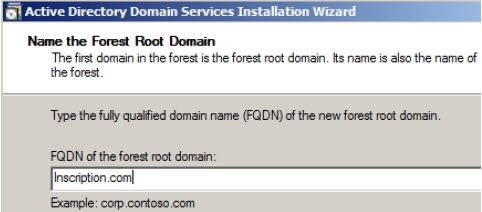
Figure 3-2 - Select the forest functional level as Windows Server 2008 from the Forest functional level dropdown on the Set Forest Functional Level page that appears, as shown in Figure 3-3.Each forest functional level supports certain features. Windows Server 2008 supports three forest functional levels. These functional levels are:
- Windows 2000: Windows 2000 functional level is the baseline, default functional level that allows domains running at domain functional levels: Windows 2000 native, Windows Server 2003, or Windows Server 2008.
- Windows Server 2003: This functional level allows a domain controller running Windows Server 2003 to interact with Windows Server 2003 or Windows Server 2008 domain controllers. The forest functional level should be Windows Server 2003 when there are only Windows 2003 or Windows 2008 domain controllers in the domain. This level supports forests trusts, domain rename, linked value replication, and RODC.
- Windows Server 2008: This functional level does not add any new forest wide features. This forest level allows only Windows Server 2008 domain controllers to be added to the forest.
- Select the appropriate forest functional level and then click Next.The forest functional level can be raised at a later stage also through Active Directory Domains and Trusts snap-in when the AD DS is installed. However, you should only raise the functional levels when you are sure that you will not need any new domains to be added at unsupported functional levels because you cannot roll back to the previous functional level.
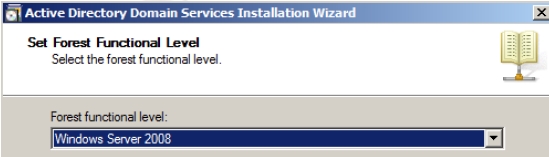
Figure 3-3 The Additional Domain Controller Options page appears, as shown in Figure 3-4. The page allows you to select the additional roles for this domain controller. All the options: DNS Server, Global Catalogue, and RODC appear disabled. This is because the DNS server role is already installed on the server, the first domain controller in a forest must be a Global Catalog therefore it must be selected, and the first domain controller in a domain cannot become an RODC.
- Click Next.
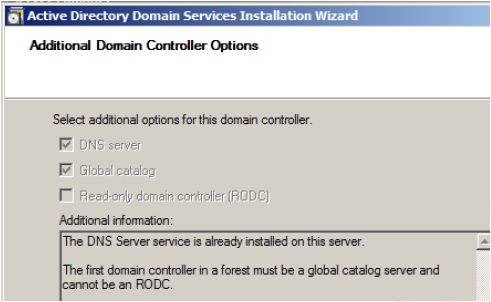
Figure 3-4 If you have not already assigned a static IP address, then a warning message appears.
- Click the Yes, the computer will use a dynamically assigned IP address (Not Recommended option) option.
- Another warning message appears that server cannot create a delegation for this server, as shown in Figure 3-5. Click Yes to continue with the installation because you can create the delegation later. You get this message at the time of installing the first domain controller in a forest/domain.
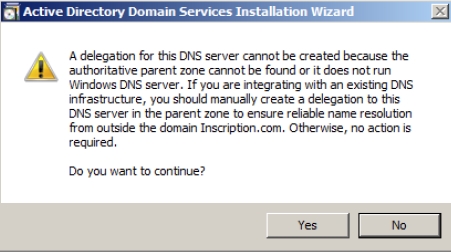
Figure 3-5 - Accept the default locations for the Database folder, Log files folder, and SYSVOL folder on the Locations for Database, Log Files, and SYSVOL page that appears and click Next, as shown in Figure 3-6.

Figure 3-6 - Type a strong password on the Directory Services Restore Mode Administrative Password page, confirm it, and then click Next.
- Confirm your selections on the Summary page and click Next. The DNS installation starts.
- Select Reboot the computer and wait for the computer to boot again.
You can add child domains or new domain trees to your forest root domain.
To create a child domain you need to:
- Install Active Directory on a Windows Server 2003 by clicking Start->Run and the typing dcpromo in the Run dialog box that appears.
- Select Add a Domain controller to an existing domain option in the Choose a Deployment Configuration page and click Next, as shown in Figure 3-7.
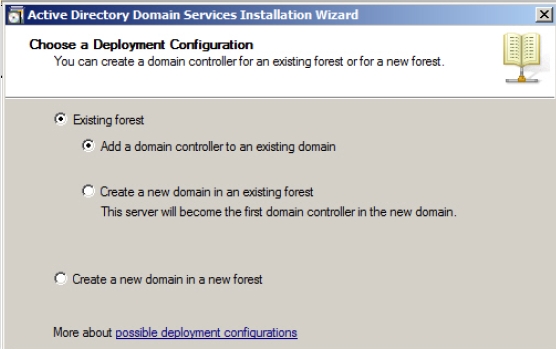
Figure 3-7 - Type inscription.com in the Type the name of any domain in the forest where you plan to install this domain controller textbox in the Network Credentials page.
- Select My current logged on credentials option and then click Next
- Select inscription.com in the Select a Domain page and click Next.
- Select Default-First-Site-Name in the Select A Site page and then click Next. The Additional Domain Controller Options page appears.
- Follow the steps from 16-22 given in Install and Configure Active Directory Domain Controller section.
The child domain will be created under the specified parent domain.