You can manually modify the issuing server settings after deploying your server. The configuration of root CA involves certain settings to be finalized. You need to create a certificate revocation configuration and personalize certificate templates according to your requirements and the configure enrollment and issuance options.
For example, if you want to use EFS to protect data, then you need to configure certificates to be used for EFS. If you want to use wireless network then you need to configure wireless certificates and if you want to use smart card then you need to configure certificates to be used for smart cards.
Although the default settings work fine for the root CA that you have installed, it is advised to review all important settings before continuing.
Right-click the root CA and select Properties from the menu that appears. The properties window of the Root CA appears.
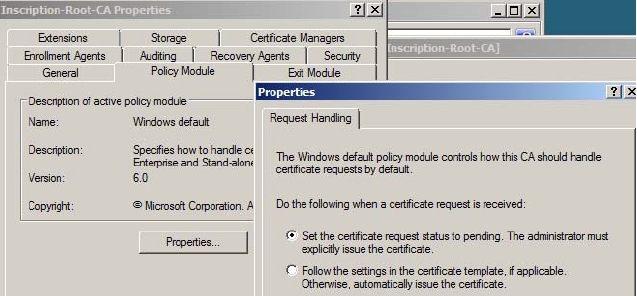
The General tab contains the View Certificate button that allows you to see the Details of the root CA certificate. The Policy Module tab allows you to define whether certificate requests should be processed automatically or manually. Click the Properties button to Set the certificate request status to pending option, as shown in Figure 7-6. For root CA, you should set the certificate request status to pending to ensure that you can manually issue the Issuing CA certificate request later on.
Figure 7-6
The Exit Module tab allows you to define whether you want to publish certificates to the file system or not. The Extensions tab allows you to define the CDP and AIA parameters. On the root CA, only allow publication to local file system and http. If you are using OCSP, enable Include in the online certificate status protocol (OCSP) extension.
The Storage tab allows you to set the storage space for the data of the CA For a standalone root CA, this will be a location on a disk. For an Enterprise root CA, this will be AD. The Certificate Managers tab allows you to delegate access to some specific templates and Enrollment Agents and Recovery Agents tabs are only supported on Enterprise CA. On the Auditing tab you should select all the events for auditing.
The Security tab allows you to define the Read, Issue/Manage Certificates, Manage the CA and Request Certificates permissions. For the root CA, you should limit the number of people having access to this CA.
After you configure or verify all the settings, you need to, restart the certificate services by typing the following command on the command line.
net stop certsvc
net start certsvc
Before issuing any certificate
Before issuing any certificate it is important to verify that all the settings are configured and are working. To verify settings, you can publish a certificate by right-clicking the Revoked Certificates node and then selecting All Tasks –> Publish. Verify that the certificate file is created under C:\certs\cdp
You can manage settings for each zone by accessing the properties of the zone by rightclicking the zone and selecting the Properties menu option from the menu that appears.
The General tab of the Properties page allows you to modify the replication scope, type, dynamic updates, aging, and the status of the zone.
Ensure that each internal DNS zone is Active Directory integrated, use proper replication scope and supports only Secure Dynamic Updates.
Configure zone transfers and replication
The General tab allows you to configure the replication scope of the zone, as shown in Figure 2-16:
Figure 2-16
The replication scope options can be seen by clicking Change button next to Replication field. The replication scope options available are:
To all DNS servers in the forest: Replicates zone data to all the DNS Server service in the AD DS forest. It replicates zone data to the ForestDNSZones partition and provides the broadest replication scope.
To all DNS servers in the domain: Replicates zone data to all DNS Server in the Active Directory domain. It replicates zone data to the DomainDNSZone partition.
To all domain controllers in the Active Directory domain: Replicates zone data to all domain controllers in the Active Directory domain to support Windows 2000 servers.
To all domain controllers in the scope of this directory partition: Replicates zone data according to the replication scope of the application directory partition, as shown in Figure 2-17. Figure 2-17
The Domain based DNS zone should replicate to all the DNS servers in the domain and the Forest based DNS zone should replicate to all the DNS servers in the forest.
While selecting the replication scope of the zone keep in mind that the broader the replication scope, the greater the network traffic is caused by replication. For example the data replication of AD DS–integrated DNS zone to all DNS servers in the forest produces more network traffic as compared to the replication of DNS zone data to all DNS servers in a single AD DS domain in that forest.
While replication, the AD DS-integrated DNS zone data stored in an application directory partition is not replicated to the global catalog for the forest whereas to provide support to Windows 2000, the data stored in a domain partition is replicated to all domain controllers in its AD DS domain, and a portion of this data is stored in the global catalog.
The Zone Transfers tab allows you to enable/disable the zone transfers and set the name servers to which you allow this zone to be transferred upon request. If the zone is integrated then the zone transfers are not required.
You can enable zone transfers by selecting Allow zone transfers option, as shown in Figure 2-18. The zone transfer can be allowed to:
To any server: allows zone transfer to any server.
Only to servers listed on the Name Servers tab: Allow zone transfers only to the DNS servers that are listed on the Name Servers tab
Only to the following servers: Allow zone transfers only to specific DNS servers listed in this tab. Figure 2-18
The WINS tab allows you to assign WINS lookups if you cannot use GNZs. The Sate of Authority (SOA) tab allows you to modify the identification information of the zone, as shown in Figure 2-19.
For example if you want to change the value of the serial number you can increment the serial number that is assigned to the zone when it is created. You can modify the Primary server of the zone, which is the server where the zone was first created. You can also modify the responsible person who operates the zone. To modify the responsible person, you need to first create the responsible person. You can modify the various time based settings for the record. Usually the default values are acceptable.
Figure 2-19
The Name Servers tab allows you to add Name Servers to the zone. Add at least two name servers in a domain as a best practice. You can add the Name Servers by clicking the Add button on the tab.
Besides creating zone, Dcpromo.exe also creates the AD DS database and initializes the directory data in that database. It also creates replication automatically. In addition, you don’t even need to add records because all Windows 2000 or later computers can register and update their own records in the dynamic DNS.
However, you still need to configure the DNS Server because everything is not configured. For example, you need to configure reverse lookup zone, record scavenging, and automatic deletion of outdated records.
Configure Scavenging for all the zones
The DNS server stores a record for a specific period of time specified in the TTL value of the record after which the record expires. The expired records need to be removed to avoid getting false positive values. The false value occurs when the host is no longer present on the network and another host is using the same IP address as the registered host. To remove these records, you need to configure the scavenging or the aging of the DNS records. To configure the scavenging, you need to:
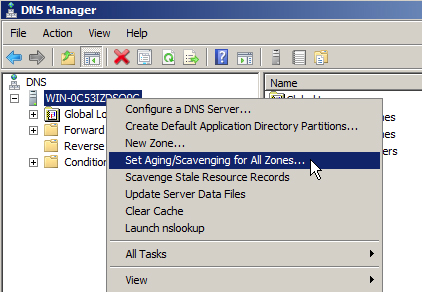
Right-click the Server Name in DNS Manager and select SetAging/Scavenging for All Zones option from the menu that appears, as shown in Figure 2-13: Figure 2-13
The Server Aging/Scavenging Properties page appears, as shown in Figure 2-14:
Select Scavenge stale resource records option to enable scavenging.
Modify the No-refresh interval and Refresh interval values if required. Usually the default values are fine.
Click OK. The No-refresh interval ignores the attempts to dynamically refresh the time stamp of the resource record by the DNS server to prevent unnecessary refreshes from being processed by the server for expired records. This also reduces Active Directory replication traffic. The refresh interval allows the dynamic refresh of the record’s time stamp processed by the DNS server. However, ensure that the length of time is greater than the maximum possible refresh period for any resource records that are contained within the zone. Figure 2-14
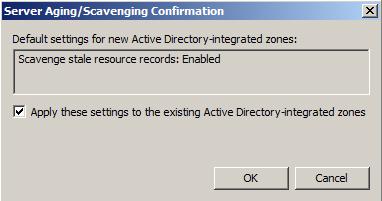
Click OK on the Server Aging/Scavenging Confirmation dialog box that appears, as shown in Figure 2-15: Figure 2-15
You can install DNS role separately or install the DNS server at the time of installing AD DS. To install DNS server role separately on your Windows Server 2008, you need to:
Log on to the server with local Administrator account.
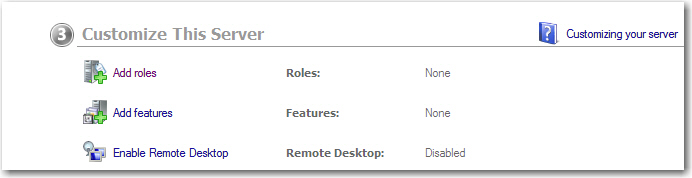
Click Add roles under Customize This Server in the Customize Your Server window, if it opens automatically, as shown in Figure 2-1: Figure 2-1
Alternatively, you can click Start->Settings->Control Panel->Administrative Tools->Server Manager and then right-click the Roles node and select Add Roles. The Add Roles Wizard appears.
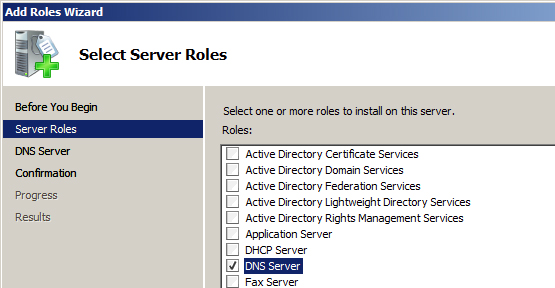
Verify the requirements to add roles on the server and click Next. The Select Server Roles page appears, as shown in Figure 2-2. Figure 2-2
Select DNS Server option from the Roles field and click Next.The DNS Server page appears. The page provides you all of the information about DNS that you may need to know before installing and using this service.
Click Next. The Confirm Installation Selection page appears.
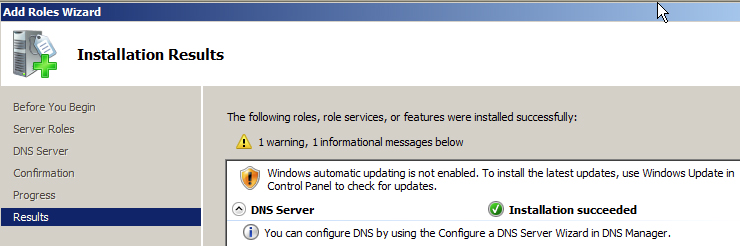
Click Install. The Installation Progress page appears.After the installation is complete, the Installation Results page appears, as shown in Figure 2-3: Figure 2-3
The page displays the warning if you have not completed the requirements mentioned on the first page of the wizard that includes enabling Automatic Updates else the page displays successful installation message without any warnings.
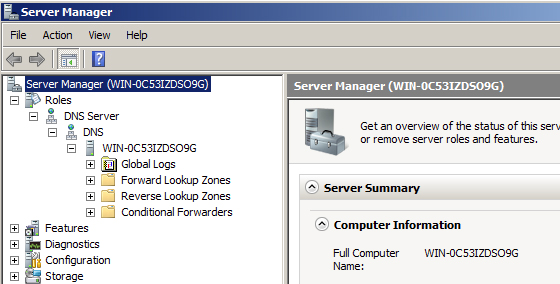
Click Close. The DNS role appears in Server Manager under Roles node, as shown in Figure 2-4. Figure 2-4
The DNS role creates the containers such as Forward Lookup Zones, Reverse LookupZones, and Conditional Forwarders that are required to run DNS service on the server.
Configure Domain Name System (DNS) for Active Directory