Active Directory Certificate Service (AD CS) provides a number of customizable services related to public key infrastructures and certificates used in software security systems. It is comprised of components such as certificate authorities, CA web enrollment, online responder, and network device enrollment service.
It allows you to encrypt data files, encrypt remote communications, secure email messages, secure logons, secure servers, secure wireless communications, and protect all data from tampering. The AD CS can run in both corporate network and outside the corporate network. It can be integrated with AD DS to provide automated certificate enrollment.
AD CS deployments are hierarchical in nature and form a chain of trust from lowest to
top most point of a hierarchy. AD CS supports two CA types:
Standalone CA: This CA runs on standalone servers and is not necessarily integrated with AD DS. It is often used as internal root CAs and can be taken offline for security purposes after being used to generate certificates for subordinate CAs.
Enterprise CA: This CA is integrated with AD DS and is installed usually on member servers. They are used to issue CAs that are subordinate to another CAs in a hierarchy. They however, provide certificates to end users and endpoint devices. These CAs are usually online all the times.
Click Next on the first page of the Add Roles Wizard that appears.
Select Active Directory Certificate Services and then click Next on the Select Server Roles page that appears.
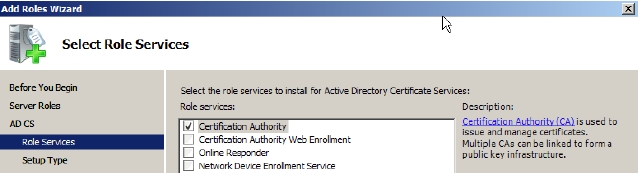
Select Certification Authority on the Select Role Services page and click Next. Because this is a root CA you need not assign other services and roles to it, as shown in Figure 7-1: Figure 7-1
Select Standalone on the Specify Setup Type page that appears and click Next.
Select Root CA on the Specify CA Type page that appears and click Next.
Select Create a new private key radio button on the Set Up Private Key and then select Next.You need to create a new private key because you are creating a new root CA. If you are reinstalling a CA due to some reason then you can select the existing key option.The Configure Cryptography for CA page appears with a number of cryptography options to configure.
CSP are the engines that MS crypto API uses to generate key pair for the root CA CSP can be software or hardware based. For example The RSA#Microsoft Software Key Storage Provider CSP is software based and RSA#Microsoft Smart Card Storage Provider CSP is hardware based.
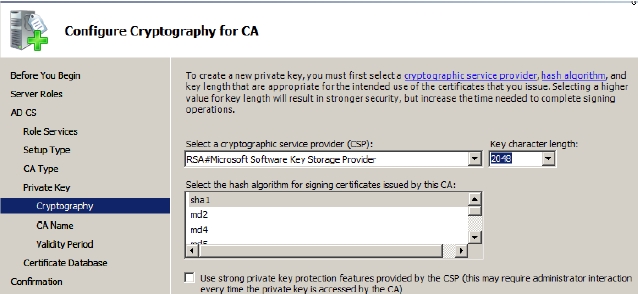
Select the suggested cryptographic service provider from the Select the cryptographic service provider (CSP) dropdown.The Key character length field allows you to select the length of the cryptography keys in pair. Before selecting the key length, you must know that longer the key length the more processing time the server will take
Select the appropriate key length from the Key character length field.The Hash algorithms are used to produce and assign hash value on the keys in pair. The hash value on key pairs ensures that the no tempering has been done with the data in the transit.
Select the SHA1 hash algorithm from the Select the hash algorithm for signing certificates issued by this CA dropdown to ensure the backward-compatibility with old versions.The Use strong private key protection features provided by the CSP option further ensures the protection of the root CA. This is because if this option is selected the CA will require only administrative access to work with, as shown in Figure 7-2.
Keep Use strong private key protection features provided by the CSP option deselected for this example and click Next Figure 7-2
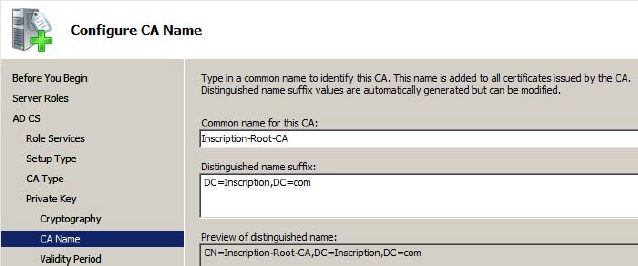
Modify the Common name of the CA in the Common name for this CA field and leave the Distinguished name suffix field as is. For this example modify the name to Inscription-Root-CA, as shown in Figure 7-3.The common name that you specify here will be embedded in each subordinate certificate issued by the name.
Click Next. Figure 7-3
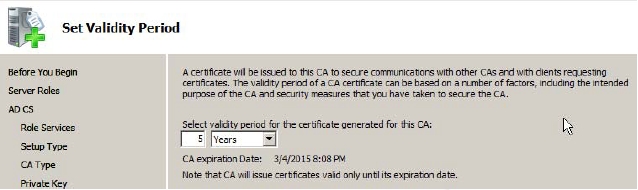
Modify the validity period of the CA in the Select validity period for the certificate generated for this CA fields if required on the Set Validity Period page, as shown in Figure 7-4 and then click Next. Figure 7-4
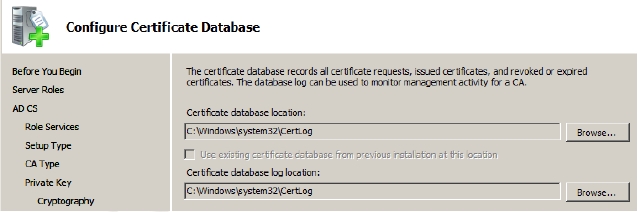
Accept the default values for the certification database or modify them if required on the Configure Certificate Database page, as shown in Figure 7-5 and click Next. Figure 7-5
Click Install on the Confirm Installations Selections pageThe installation process starts and you will now never be able to change the name of the server unless you uninstall AD CS first.
Follow the steps given below to install and configure an Active Directory Domain Controller:
To Install AD DS on the server, you need to:
Log on to the server with local Administrator account.
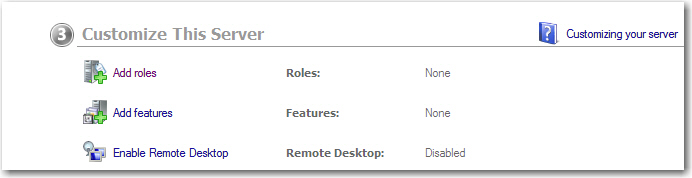
Click Add roles under Customize This Server in the Server Manager window, if it opens automatically.Alternatively, you can click Start-> Settings->Control Panel-> Administrative Tools- >Server Manager and then right-click the Roles node and select Add Roles. The Add Roles Wizard appears.
Verify the requirements to add roles on the server and click Next. The Select Server Roles page appears.
Select Active Directory Domain Services option from the Roles field and click Next. The Active Directory Domain Services page appears. The page provides you all the information about AD DS that you may need to know before installing and using this service.
Click Next. The Confirm Installation Selection page appears.
Click Install. The Installation Progress page appears. After the installation is complete, the Installation Results page appears
Click Close.
Type dcpromo.exe in the Run dialog box. The Active Directory Domain Services installation Wizard appears.
Click Next. The Operating System Compatibility page appears. The page provides you information about Windows Server 2008 compatibility with older versions of Windows.
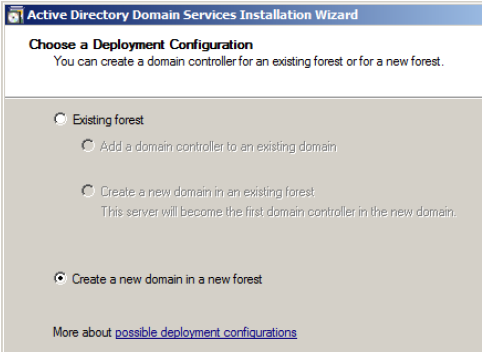
Click Next. The Choose a Deployment Configuration page appears.The page provides you options to use the existing forest and create a new domain or add a domain controller to it or create a new domain in a new forest.
Select Create a new domain in a new forest option and click Next, as shown in Figure 3-1.The first domain created in your forest becomes the forest root domain. You can keep this existing domain as a forest root domain or create a dedicated forest root domain in a multidomain scenario. If you have a single domain forest then the forest root domain will contain all the users, groups, and resources. However, if you have a multiple domain forest and you create a dedicated forest root domain, then it will contain only forest administration accounts. Figure 3-1
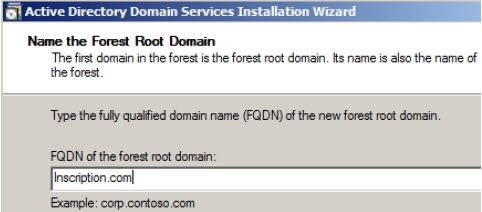
Type the complete name of the forest that you are creating in the FQDN of the forest root domain field on the Name the Forest Root Domain page that appears, as shown in Figure 3-2.
Click Next. Figure 3-2
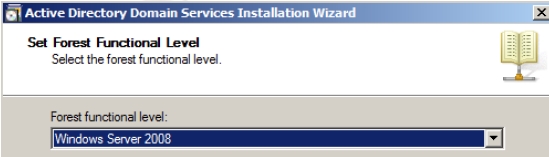
Select the forest functional level as Windows Server 2008 from the Forest functional level dropdown on the Set Forest Functional Level page that appears, as shown in Figure 3-3.Each forest functional level supports certain features. Windows Server 2008 supports three forest functional levels. These functional levels are:
Windows 2000: Windows 2000 functional level is the baseline, default functional level that allows domains running at domain functional levels: Windows 2000 native, Windows Server 2003, or Windows Server 2008.
Windows Server 2003: This functional level allows a domain controller running Windows Server 2003 to interact with Windows Server 2003 or Windows Server 2008 domain controllers. The forest functional level should be Windows Server 2003 when there are only Windows 2003 or Windows 2008 domain controllers in the domain. This level supports forests trusts, domain rename, linked value replication, and RODC.
Windows Server 2008: This functional level does not add any new forest wide features. This forest level allows only Windows Server 2008 domain controllers to be added to the forest.
Select the appropriate forest functional level and then click Next.The forest functional level can be raised at a later stage also through Active Directory Domains and Trusts snap-in when the AD DS is installed. However, you should only raise the functional levels when you are sure that you will not need any new domains to be added at unsupported functional levels because you cannot roll back to the previous functional level. Figure 3-3
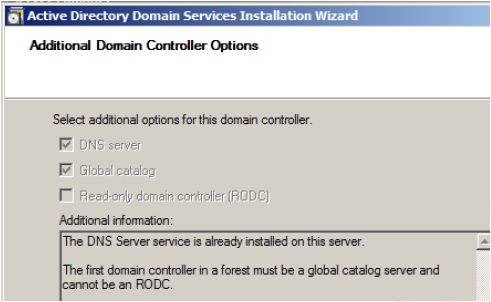
The Additional Domain Controller Options page appears, as shown in Figure 3-4. The page allows you to select the additional roles for this domain controller. All the options: DNS Server, Global Catalogue, and RODC appear disabled. This is because the DNS server role is already installed on the server, the first domain controller in a forest must be a Global Catalog therefore it must be selected, and the first domain controller in a domain cannot become an RODC.
Click Next. Figure 3-4
If you have not already assigned a static IP address, then a warning message appears.
Click the Yes, the computer will use a dynamically assigned IP address (Not Recommended option) option.
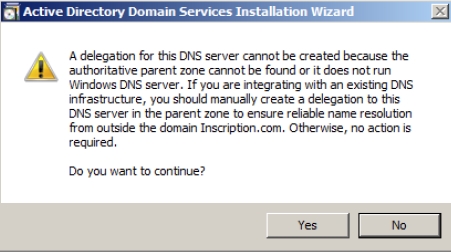
Another warning message appears that server cannot create a delegation for this server, as shown in Figure 3-5. Click Yes to continue with the installation because you can create the delegation later. You get this message at the time of installing the first domain controller in a forest/domain. Figure 3-5
Accept the default locations for the Database folder, Log files folder, and SYSVOL folder on the Locations for Database, Log Files, and SYSVOL page that appears and click Next, as shown in Figure 3-6. Figure 3-6
Type a strong password on the Directory Services Restore Mode Administrative Password page, confirm it, and then click Next.
Confirm your selections on the Summary page and click Next. The DNS installation starts.
Select Reboot the computer and wait for the computer to boot again.
You can add child domains or new domain trees to your forest root domain.
To create a child domain you need to:
Install Active Directory on a Windows Server 2003 by clicking Start->Run and the typing dcpromo in the Run dialog box that appears.
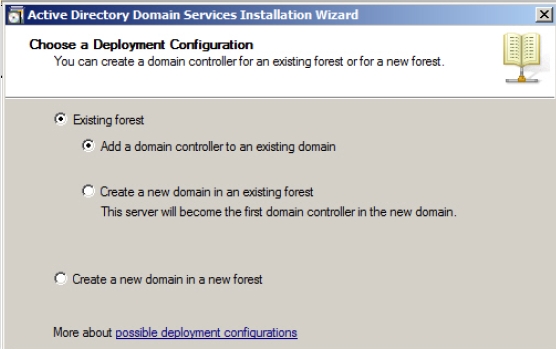
Select Add a Domain controller to an existing domain option in the Choose a Deployment Configuration page and click Next, as shown in Figure 3-7. Figure 3-7
Type inscription.com in the Type the name of any domain in the forest where you plan to install this domain controller textbox in the Network Credentials page.
Select My current logged on credentials option and then click Next
Select inscription.com in the Select a Domain page and click Next.
Select Default-First-Site-Name in the Select A Site page and then click Next. The Additional Domain Controller Options page appears.
Follow the steps from 16-22 given in Install and Configure Active Directory Domain Controller section.
The child domain will be created under the specified parent domain.
You can install DNS role separately or install the DNS server at the time of installing AD DS. To install DNS server role separately on your Windows Server 2008, you need to:
Log on to the server with local Administrator account.
Click Add roles under Customize This Server in the Customize Your Server window, if it opens automatically, as shown in Figure 2-1: Figure 2-1
Alternatively, you can click Start->Settings->Control Panel->Administrative Tools->Server Manager and then right-click the Roles node and select Add Roles. The Add Roles Wizard appears.
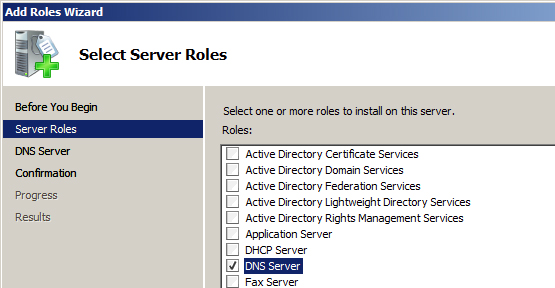
Verify the requirements to add roles on the server and click Next. The Select Server Roles page appears, as shown in Figure 2-2. Figure 2-2
Select DNS Server option from the Roles field and click Next.The DNS Server page appears. The page provides you all of the information about DNS that you may need to know before installing and using this service.
Click Next. The Confirm Installation Selection page appears.
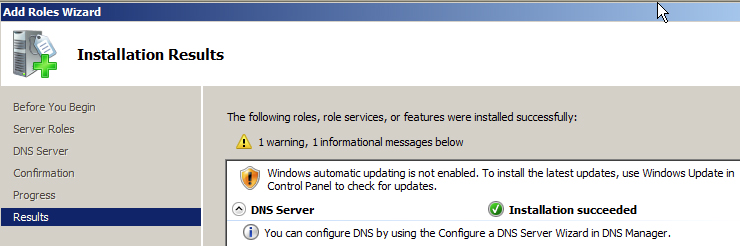
Click Install. The Installation Progress page appears.After the installation is complete, the Installation Results page appears, as shown in Figure 2-3: Figure 2-3
The page displays the warning if you have not completed the requirements mentioned on the first page of the wizard that includes enabling Automatic Updates else the page displays successful installation message without any warnings.
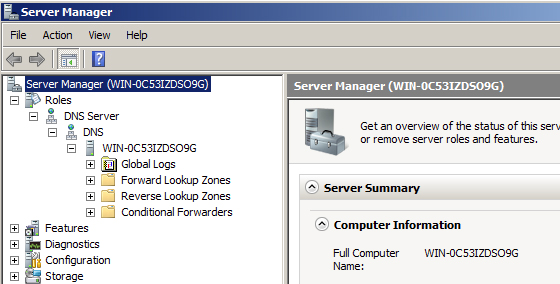
Click Close. The DNS role appears in Server Manager under Roles node, as shown in Figure 2-4. Figure 2-4
The DNS role creates the containers such as Forward Lookup Zones, Reverse LookupZones, and Conditional Forwarders that are required to run DNS service on the server.
Configure Domain Name System (DNS) for Active Directory