An RODC contains a read only copy of all the objects in the domain to allow local authentication of users in each branch office. It performs replication with the domain controller at the main site to keep its data updated. RODC also reduces the physical security threat for the domain controller at the branch office because it does not keep a copy of confidential attributes (secrets) such as password-related properties on it. In case the security is compromised, much harm is not caused.
Before installing the Read Only Domain Controller in your forest/domain, you need to:
Ensure that the Forest functional level of the domain/forest is Windows Server 2003 or higher. If the domain has any Windows Server 2003 domain controller running in it. Run adprep / rodcprep. This command prepares the domain controllers that are running Windows Server 2003 for replication of DNS application directory partitions.
Ensure that at least one writable domain controller is running Windows Server 2008 to ensure that the RODC is able to establish a connection with writable Windows Server 2008 to perform replication.
Install RODC
You can install RODC on a full installation or the core installation of Windows Server 2008 on a member server in the domain.
To install RODC on a full installation of Windows Server 2008, you need to:
Ensure that your Primary Domain Controller is switched on.
Log on to the Windows Server 2008 server that you want to configure as RODC with domain administrative credentials.
Click Start->Run and type dcpromo.A window informing you about the installation of Active Directory Domain Services binaries appears. After this installation is complete the Active Directory Domain Services Installation Wizard appears.
Click Next.
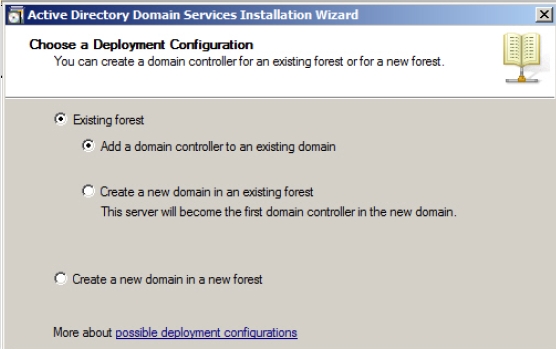
Click Next on the Operating System Compatibility page that appears.The Choose a Deployment Configuration page appears. The page allows you to create a new domain or a forest or add new domain controllers or new domains to the existing forest.
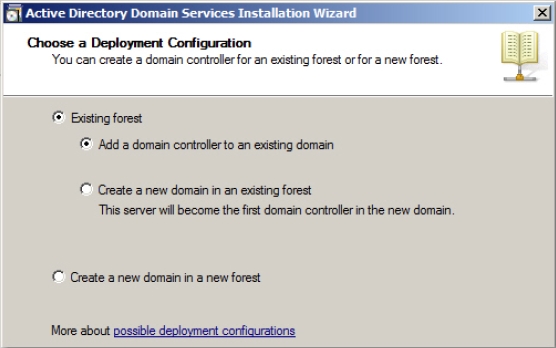
Select Existing forest option and then select Add a domain controller to an existing domain option under it and click Next, as shown in Figure 4-9.The RODC is always added to the existing forest in the existing domain. Figure 4-10
The Network Credentials page appears, as shown in Figure 4-11.
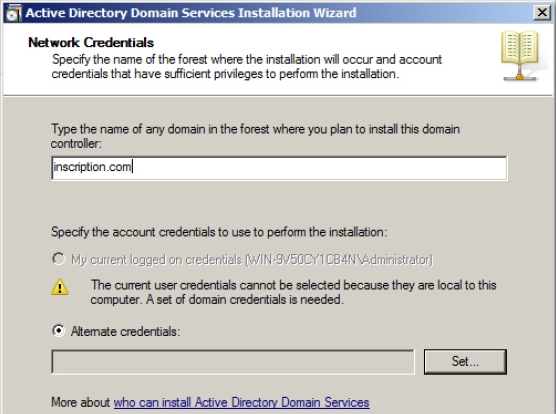
The page allows you to provide the name of the forest/domain where you want to add the RODC.
Provide the name of the domain in which you want to add RODC in the Type the name of any domain in the forest where you want to plan to install this domain controller field.
Select Alternate credentials option and then click Set. Figure 4-11
Provide your domain administrative credentials in the Username and the Password fields respectively and click OK on the Windows Security page that appears.The username that you have provided along with the domain name appears in the Alternate credentials field.
Click NextThe Examining Active Directory forest window appears. The window tries to establish a connection between the domain controller and this server with the account credentials that you had provided in the previous step so that RODC can be installed on this server.
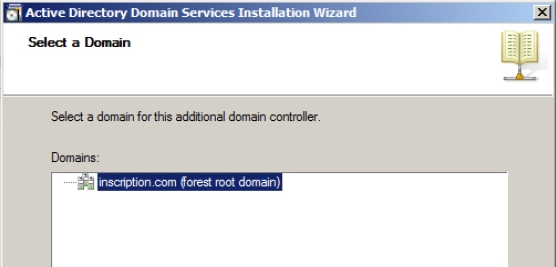
Select the domain for this domain controller and click Next on the Select a Domain page that appears, as shown in Figure 4-12. Figure 4-12
The Select a Site page appears.
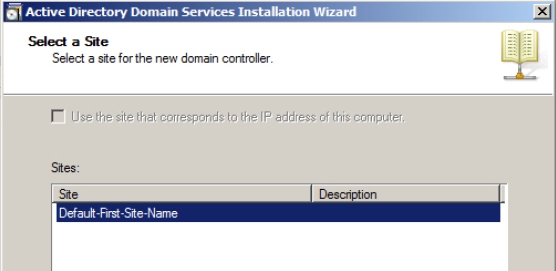
Select the site that you created for the new branch office for which you want to install the RODC.If no site is created then the Default-First-Site-Name option appears, as shown in Figure 4-13. Figure 4-13
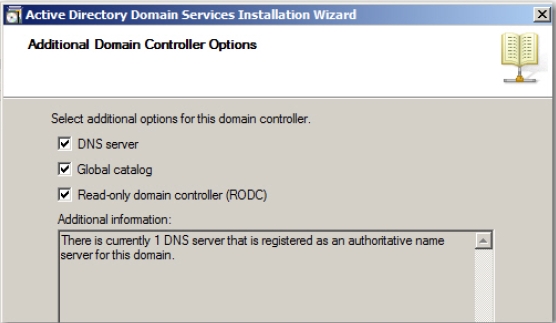
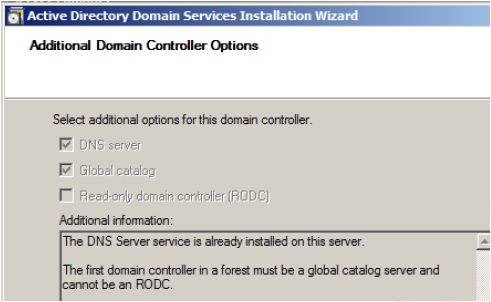
The Additional Domain Controller Options page appears, as shown in Figure 4-14.
Select Read-only domain controller (RODC) option from the Select additional options from the domain controller field.
Verify that DNS Server and Global catalog options are also selected. Figure 4-14
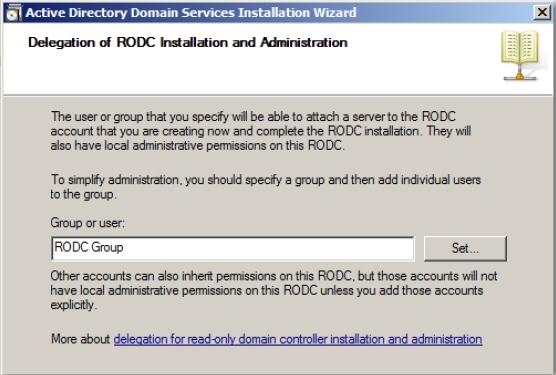
The Delegation of RODC Installation and Administration page appears, as shown in Figure 4-15.
The page allows you to specify the name of a user or group who will have local administrative rights on this RODC to attach servers to it.
Provide the user name or the group name in the Group or user field optionally and click Next. Figure 4-15
The Location for Database, Log Files, and SYSVOL page appears.
Verify/modify the locations of Database folder, Log files folder, and SYSVOL folder in their respective fields and click Next.The Directory Services Restore Mode Administrator Password page appears. The page allows you to set a password that will be used when this domain controller will be started in the Directory Services Restore mode to restore the Directory services.
Provide a strong password in the Password field and retype the password in the Confirm password field.
Verify the selection you have made up till now to install RODC on this server and click Next on the Summary page appears.The Active Directory Domain Services Installation Wizard page appears displaying the progress of the installation.
Select Reboot on completion checkbox and click Finish.
Follow the steps given below to install and configure an Active Directory Domain Controller:
To Install AD DS on the server, you need to:
Log on to the server with local Administrator account.
Click Add roles under Customize This Server in the Server Manager window, if it opens automatically.Alternatively, you can click Start-> Settings->Control Panel-> Administrative Tools- >Server Manager and then right-click the Roles node and select Add Roles. The Add Roles Wizard appears.
Verify the requirements to add roles on the server and click Next. The Select Server Roles page appears.
Select Active Directory Domain Services option from the Roles field and click Next. The Active Directory Domain Services page appears. The page provides you all the information about AD DS that you may need to know before installing and using this service.
Click Next. The Confirm Installation Selection page appears.
Click Install. The Installation Progress page appears. After the installation is complete, the Installation Results page appears
Click Close.
Type dcpromo.exe in the Run dialog box. The Active Directory Domain Services installation Wizard appears.
Click Next. The Operating System Compatibility page appears. The page provides you information about Windows Server 2008 compatibility with older versions of Windows.
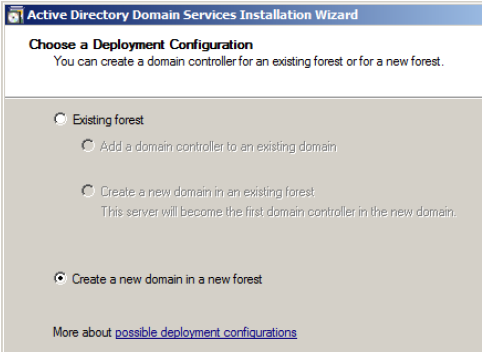
Click Next. The Choose a Deployment Configuration page appears.The page provides you options to use the existing forest and create a new domain or add a domain controller to it or create a new domain in a new forest.
Select Create a new domain in a new forest option and click Next, as shown in Figure 3-1.The first domain created in your forest becomes the forest root domain. You can keep this existing domain as a forest root domain or create a dedicated forest root domain in a multidomain scenario. If you have a single domain forest then the forest root domain will contain all the users, groups, and resources. However, if you have a multiple domain forest and you create a dedicated forest root domain, then it will contain only forest administration accounts. Figure 3-1
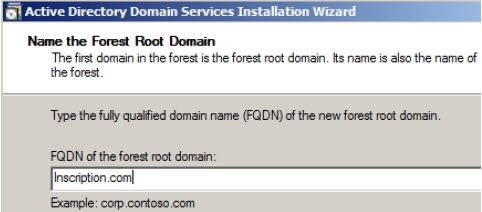
Type the complete name of the forest that you are creating in the FQDN of the forest root domain field on the Name the Forest Root Domain page that appears, as shown in Figure 3-2.
Click Next. Figure 3-2
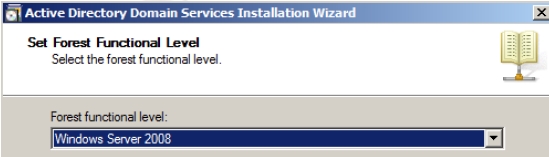
Select the forest functional level as Windows Server 2008 from the Forest functional level dropdown on the Set Forest Functional Level page that appears, as shown in Figure 3-3.Each forest functional level supports certain features. Windows Server 2008 supports three forest functional levels. These functional levels are:
Windows 2000: Windows 2000 functional level is the baseline, default functional level that allows domains running at domain functional levels: Windows 2000 native, Windows Server 2003, or Windows Server 2008.
Windows Server 2003: This functional level allows a domain controller running Windows Server 2003 to interact with Windows Server 2003 or Windows Server 2008 domain controllers. The forest functional level should be Windows Server 2003 when there are only Windows 2003 or Windows 2008 domain controllers in the domain. This level supports forests trusts, domain rename, linked value replication, and RODC.
Windows Server 2008: This functional level does not add any new forest wide features. This forest level allows only Windows Server 2008 domain controllers to be added to the forest.
Select the appropriate forest functional level and then click Next.The forest functional level can be raised at a later stage also through Active Directory Domains and Trusts snap-in when the AD DS is installed. However, you should only raise the functional levels when you are sure that you will not need any new domains to be added at unsupported functional levels because you cannot roll back to the previous functional level. Figure 3-3
The Additional Domain Controller Options page appears, as shown in Figure 3-4. The page allows you to select the additional roles for this domain controller. All the options: DNS Server, Global Catalogue, and RODC appear disabled. This is because the DNS server role is already installed on the server, the first domain controller in a forest must be a Global Catalog therefore it must be selected, and the first domain controller in a domain cannot become an RODC.
Click Next. Figure 3-4
If you have not already assigned a static IP address, then a warning message appears.
Click the Yes, the computer will use a dynamically assigned IP address (Not Recommended option) option.
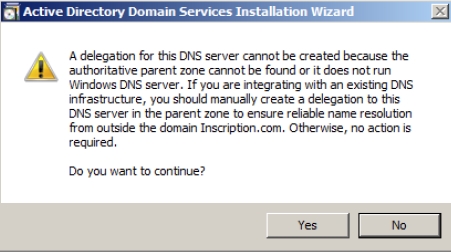
Another warning message appears that server cannot create a delegation for this server, as shown in Figure 3-5. Click Yes to continue with the installation because you can create the delegation later. You get this message at the time of installing the first domain controller in a forest/domain. Figure 3-5
Accept the default locations for the Database folder, Log files folder, and SYSVOL folder on the Locations for Database, Log Files, and SYSVOL page that appears and click Next, as shown in Figure 3-6. Figure 3-6
Type a strong password on the Directory Services Restore Mode Administrative Password page, confirm it, and then click Next.
Confirm your selections on the Summary page and click Next. The DNS installation starts.
Select Reboot the computer and wait for the computer to boot again.
You can add child domains or new domain trees to your forest root domain.
To create a child domain you need to:
Install Active Directory on a Windows Server 2003 by clicking Start->Run and the typing dcpromo in the Run dialog box that appears.
Select Add a Domain controller to an existing domain option in the Choose a Deployment Configuration page and click Next, as shown in Figure 3-7. Figure 3-7
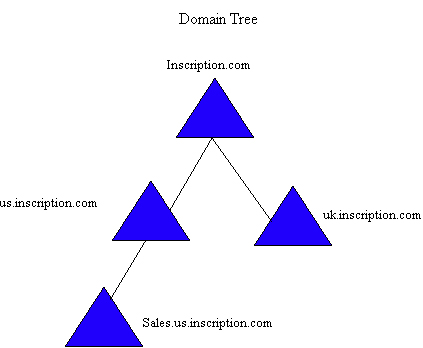
Type inscription.com in the Type the name of any domain in the forest where you plan to install this domain controller textbox in the Network Credentials page.
Select My current logged on credentials option and then click Next
Select inscription.com in the Select a Domain page and click Next.
Select Default-First-Site-Name in the Select A Site page and then click Next. The Additional Domain Controller Options page appears.
Follow the steps from 16-22 given in Install and Configure Active Directory Domain Controller section.
The child domain will be created under the specified parent domain.
To implement an Active directory infrastructure in your organization, you need a proper planning that includes creating a forest plan, domain plan, organizational unit plan, and a site topology. After, you have your AD infrastructure plan ready with a domain structure, domain name, storage location of database log files, location of shared system folder, DNS configuration, you can continue with configuring your first domain controller that will implement Active Directory in your domain/forest.
The first domain controller that you install in your organization becomes the first forest root, first domain tree, first domain, and first site installed on your network. You can install Active Directory in your network in a number of ways. You can use Active Directory Installation Wizard to install Active Directory, an Answer File to Perform an Unattended Installation, Using a Network or Backup Media, and using the ‘Configure Your Server’ Wizard to install Active Directory.
The logical components in Active Directory are stored in a logical structure that contains domains, organizational units, and trees. These logical components allow the grouping of resources of the AD objects. The logical components of an Active directory include:
Domain: It can span different physical locations and uses access control list (ACL) of an object to decide the access rights of the objects.
Organizational units (OU): It is a container object of a domain that is used to organize objects into logical administrative group.
Trees: It is a hierarchical group of domains that belong to a same tree and share contiguous namespace and hierarchical naming structure, as shown in Figure 2- 20. Figure 2-20
Forests: It is a hierarchical grouping of one or more independent trees. It allows all the domains under it share a common schema and a common global catalog. All the domains in a forest however operate independently but are linked by implicit two-way transitive trusts and thus the communication across all the domains of an organization is possible. The trees in a forest can have their own naming structure according to their domains, as shown in Figure 2-21: Figure 2-21 Section 3.1: Figure 2-21
The Active Directory Domain Services (AD DS) provides directory services that enable an enterprise administrator to mange a huge network centrally and securely. The network might span a building or multiple geographical locations around the world.
With the introduction of Identity and Access (IDA) technology in Windows Server 2008 Active Directory (AD), the security of the system has increased with the decrease in operational cost. The IDA solution has greatly helped in deepening the electronic relationships of a company with its customers and partners. It enables a company to successfully protect its infrastructure centrally that includes files, emails, applications and databases.
The IDA solution is especially designed for enterprise networks to manage the identities and relationships that make up network environments. Below given are some important features of IDA:
It stores information about users, groups, computers and other identities.
It authenticates the identity of the user and grants access to the user if the access request is valid.
It controls access to protected and confidential documents on the basis of the policies present in AD DS.
It provides and audit trail by monitoring changes to and activities within the IDA infrastructure.
The components of IDA are:
AD DS (Active Directory Domain Services): AD DS is the central repository of the system that allows easy management of AD objects within an organization. Users can find objects such as printers, file server, users, and groups by searching the Active Directory. It provides authorization and authentication service to network users through group policy. AD DS also provides information management and sharing services.It can only run on a domain controller. AD DS supports Group Policy, integrates with Public Key Infrastructures (PKI), Messaging APIs; and X.509 certificates, mange objects such as servers and workstations, authenticate domain security principals, and do much more. AD DS should be used for applications like Exchange Server that significantly extends AD DS schema to provide core networking service to an organization.
AD LDS (Active Directory Lightweight Services): AD LDS is a simplified or a standalone version of AD DS. It provides mostly the same features as AD DS except a few features that include security principals and the modification of AD DS. Its main feature however is to provide directory services to directory-enabled applications without the overhead of modifying database schema of Network Operating system throughout a forest. AD LDS stores and replicates only application related information.You can install AD LDS on client workstations and use AD LDS single instance directories to develop applications that require access to identity data. As a thumb rule consider installing AD LDS instead of AD DS, if you don’t need to extend directory schema to run a directory-enabled application. AD LDS is quite a flexible service that uses Lightweight Directory Access Protocol (LDAP) to support directory-enabled applications. It however, relies on multimaster replication for data consistency just like AD DS and supports Application Programming Interface (API), Active Directory Services Interface (ADSI), replication from removable media, and backup tools similar to AD DS.
AD CS (Active Directory Certificate Services): AD CS allows you to set up a certificate authority for issuing digital certificates. It allows you to create custom public key certificates that bind the identity of a person, device, or service to a corresponding private key. The certificates can be used to authenticate users, computers, and other services in software security systems that employ public key technologies.The Certification authorities (CAs) are used to issue certificates to manage certificate validity. It uses also web enrollment that allows users to connect to a CA by means of a Web browser and then request certificates and perform smart card certificate enrollment. AD CS provides a cost-effective, efficient, and secure way to manage the distribution and use of certificates. Although AD CS can be deployed on a single server, it may at times require multiple servers configured as CAs, Online Responders, and Web enrollment portals.
AD RMS (Active Directory Rights Management Services): AD RMS allows you to protect information from unauthenticated access. It uses AD DS to regulate access to rights-protected content for all AD RMS users in an AD DS forest. Although, the document’s ACL can be used to protect it from unauthorized access, ADRMS implements persistent usage policy templates. These templates define allowed or unauthorized use of the document when it is online, offline or inside/outside the firewall.
AD FS (Active Directory Federation Services: AD FS is a partnership service that allows the IDA to extend between trusted business partners across an extranet. It is supported on both Windows and non-Windows environment. It allows an organization to authenticate the users and project identity and access rights across the security boundaries of trusted partners. In a federated environment each organization manages its own identities. However, users who get authenticated in their organization can access the resources of the other organization. This process is known as SSO (Single Sign on). AD FS requires a trust policy to be created.
Configure Domain Name System (DNS) for Active Directory