The certificate revocation is allows you to control certificates. The certificates may become invalid at times because either they expire or they are compromised. Certificate was revoked due to a compromise. The certificate server maintains a list of revoked certificates and publishes at specified intervals in a CRL (Certificate Revocation List). This list ensures that the certificate presented is valid and in the certificate chain. A certificate manager can revoke a certificate through the CA console.
The high level steps to create a revocation configuration of CA include the specification of CRL distribution points, Configuration of Delta CRL overlap periods, and schedule the publication of CRLs.
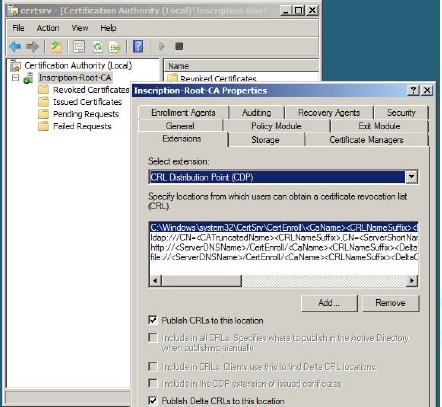
To specify the CRL Distribution points, you need to:
Stop and then restart the certification service by typing the commands:
net stop certsvc
net start certsvc
You should now configure the publication of the CRLs. To configure the publication of CRLs, you need to go to the Certification Authority console again.
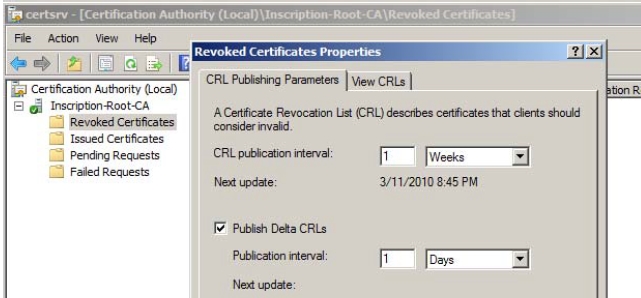
Expand the Root CA, right-click the Revoked Certificates node and then select Properties from the menu that appears. The Revoked Certificates Properties window appears, as shown in Figure.
Configure the CRL publication interval and Publish Data CRLs interval as desired or accept the default values. Before configuring the interval, you should know that to ensure the high availability of the CRLs, you need to decrease the values because the decreases interval will ensure high throughput and availability of certificates, as shown in Figure 7-18: Figure 7-18
Click OK. The revocation configuration is complete.
If you are using classic CRL, then you may have to face a number of problems related to the growing number of CRLs. This is because as the number of certificates grows, the number of revoked certificates will also increase. As a result, the CRL file will just grow large and the clients will have to spend a long time to download the CRL files.
To resolve such problem, you can set up additional CA’s but this will not actually solve the problem. To solve this problem you should consider the implementation of an OCSP (Online Certificate Status Protocol), which can be done through Online Responder service.
Once you are ready with your certificates, you must manage the enrollment of certificates. The enrollment allows the users to request, retrieve, renew, and update the certificates. The Autoenrollment feature of AD CS allows the certificates to be distributed without the client even being aware of the enrollment.
To properly configure autoenrollment of certificates, you need to plan the appropriate certificate template and the settings in the certificate template directly affect the behavior of certificate autoenrollment. You can implement autoenrollment, through GPO.
To configure autoenrollment Group Policy for a domain, you need to:
Click Start->Settings->Control Panel-> Administrative Tools-> Group Policy Management. The GPMC appears.
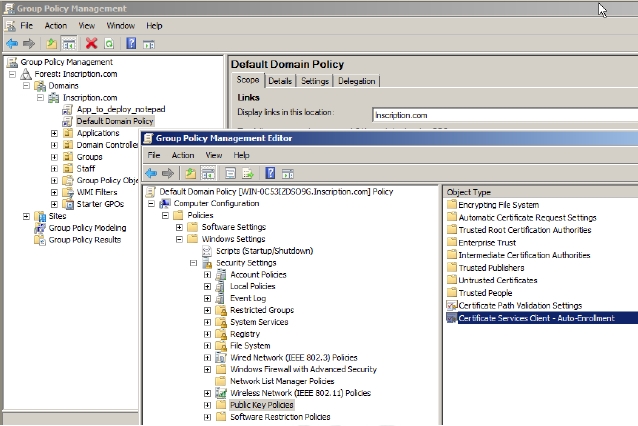
Right-click the Default Domain Policy GPO for the domain in which you want to configure autoenrollment and then click Edit. The Group Policy Management Editor appears, as shown in Figure.
Expand Computer Configuration->Windows Settings-> Security Settings and click Public Key Policies to assign autoenrollment to computers.
Double-click Certificate Services Client->Auto-Enrollment on the details pane, as shown in Figure 7-12: Figure 7-12
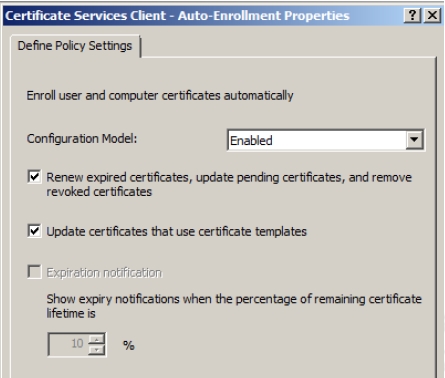
The Certificate Services Client->Auto-Enrollment Properties window appears, as shown in Figure 7-13
Select Enabled from the Configuration Model dropdown.
Select Renew expired certificates, update pending certificates, and remove revoked certificates checkboxes to enable autoenrollment for certificate renewal, issuance of pending certificate requests, and the automatic removal of revoked certificates from a computer’s certificate store respectively.
Select Update certificates that use certificate templates checkbox if you have already issued some certificates manually.
Click OK and then close GPME and GPMC. Figure 7-13
This will configure autoenrollment for computers. You can follow the same procedure to configure autoenrollment for users. The only difference will be to go to User Configuration node instead of Computer Configuration node in the GPME console.
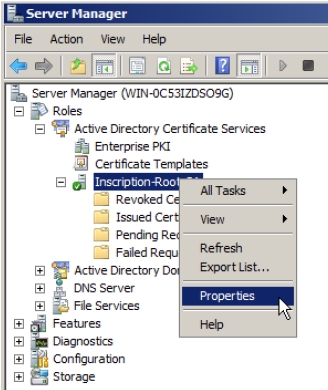
Open the Server Manager-> Roles->Active Directory Certificate Services
Right-click the <Issuing CA server name> and then select Properties from the menu that appears, as shown in Figure 7-14: Figure 7-14
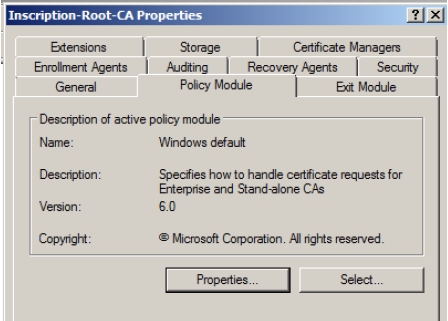
The Properties window of the issuing CA server appears, as shown in Figure 7-15.
Click Policy Module tab and then click Properties. Figure 7-15
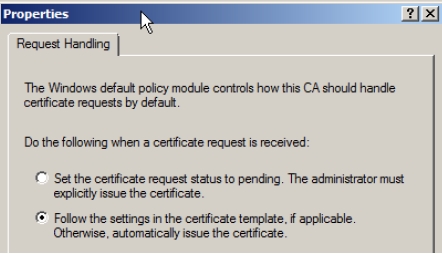
Select Follow the settings in the Certificate template, if applicable. Otherwise, automatically issue the certificate option and then click OK, as shown in Figure 7-16: Figure 7-16
Click OK again.
Your Issuing CA is now ready to use and will issue the certificates automatically when they are requested by the devices or by the users of the domain.
The certificate templates are the certificates that you want to use with your applications. A number of certificates templates are offered to you to by AD CS. The certificate templates are configurable and can be personalized. To use templates, you need to be connected to DC so that templates can be published to AD DS. If you are not connected to DC then you need to connect to the DC through the Server Manager before continuing to configure templates.
To configure certificate templates, you need to:
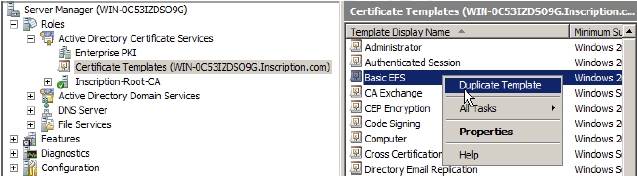
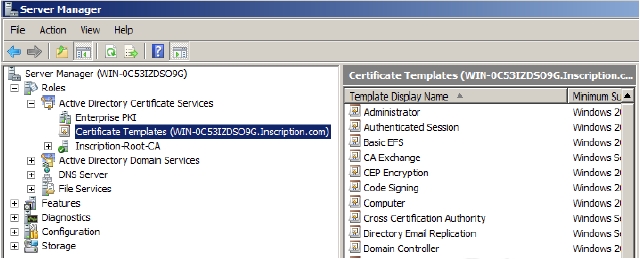
Click Start->Settings->Control Panel->Administrative Tools-> Server Manager->Roles->Active Directory Certificate Services->Certificate Templates, <server name> as shown in Figure 7-7.A list of templates appear on the details pane Figure 7-7
Right-click the template that you want to use and select Duplicate Template from the menu that appears, as shown in Figure 7-8: Figure 7-8
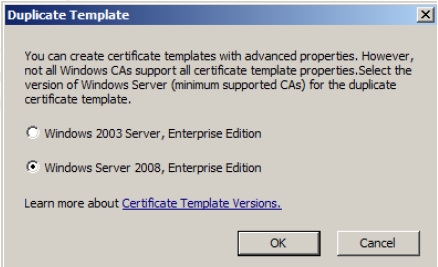
The Duplicate Template window appears, as shown in Figure 7-9.
Select the version of Windows Server to support. Select Windows Server 2008 unless you are working in a mixed PKI hierarchy and then click OK. Figure 7-9
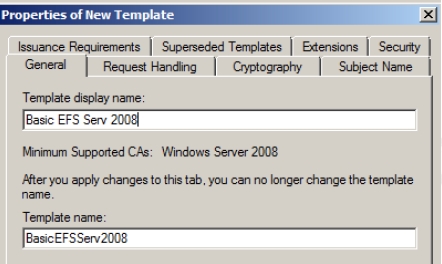
The Properties of New Template window appears, as shown in Figure 7-10. The General tab displays a default name for the duplicate template.
Provide a meaningful name to the template in the Template display name field. Figure 7-10
Click Request Handling tab and select Include symmetric algorithms allowed by the subject, Archive subject’s encryption private key, and Use advanced Symmetric algorithm to send the key to the CA options, as shown in Figure 7- 11: Figure 7-11
You can configure the other tabs as per your requirements.
Click OK.The configuration of a template often requires some other activities or other templates also to be configured. For example, if you are configuring Basic EFS template then you should also configure EFS Recovery Agent Template. For a complete help on the template that you want to configure you should view the online help for the AD CS.
Once your template is ready, you must issue the template to enable CA to issue certificates based on it.
Go to Server Manager->Roles->Active Directory Certificate Services- >
->Certificate Templates
Right-click Certificate Templates and then select New->Certificate Template to Issue. The Enable Certificate Templates dialog box appears.
Select the templates that you want to issue by using CTRL+Click and then click OK.
Configure Domain Name System (DNS) for Active Directory