Active Directory Certificate Service (AD CS) provides a number of customizable services related to public key infrastructures and certificates used in software security systems. It is comprised of components such as certificate authorities, CA web enrollment, online responder, and network device enrollment service.
It allows you to encrypt data files, encrypt remote communications, secure email messages, secure logons, secure servers, secure wireless communications, and protect all data from tampering. The AD CS can run in both corporate network and outside the corporate network. It can be integrated with AD DS to provide automated certificate enrollment.
AD CS deployments are hierarchical in nature and form a chain of trust from lowest to
top most point of a hierarchy. AD CS supports two CA types:
Standalone CA: This CA runs on standalone servers and is not necessarily integrated with AD DS. It is often used as internal root CAs and can be taken offline for security purposes after being used to generate certificates for subordinate CAs.
Enterprise CA: This CA is integrated with AD DS and is installed usually on member servers. They are used to issue CAs that are subordinate to another CAs in a hierarchy. They however, provide certificates to end users and endpoint devices. These CAs are usually online all the times.
Click Next on the first page of the Add Roles Wizard that appears.
Select Active Directory Certificate Services and then click Next on the Select Server Roles page that appears.
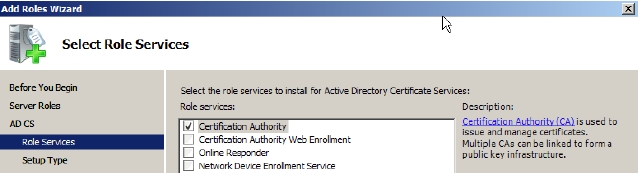
Select Certification Authority on the Select Role Services page and click Next. Because this is a root CA you need not assign other services and roles to it, as shown in Figure 7-1: Figure 7-1
Select Standalone on the Specify Setup Type page that appears and click Next.
Select Root CA on the Specify CA Type page that appears and click Next.
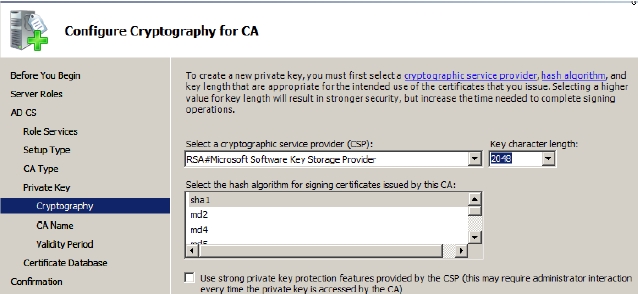
Select Create a new private key radio button on the Set Up Private Key and then select Next.You need to create a new private key because you are creating a new root CA. If you are reinstalling a CA due to some reason then you can select the existing key option.The Configure Cryptography for CA page appears with a number of cryptography options to configure.
CSP are the engines that MS crypto API uses to generate key pair for the root CA CSP can be software or hardware based. For example The RSA#Microsoft Software Key Storage Provider CSP is software based and RSA#Microsoft Smart Card Storage Provider CSP is hardware based.
Select the suggested cryptographic service provider from the Select the cryptographic service provider (CSP) dropdown.The Key character length field allows you to select the length of the cryptography keys in pair. Before selecting the key length, you must know that longer the key length the more processing time the server will take
Select the appropriate key length from the Key character length field.The Hash algorithms are used to produce and assign hash value on the keys in pair. The hash value on key pairs ensures that the no tempering has been done with the data in the transit.
Select the SHA1 hash algorithm from the Select the hash algorithm for signing certificates issued by this CA dropdown to ensure the backward-compatibility with old versions.The Use strong private key protection features provided by the CSP option further ensures the protection of the root CA. This is because if this option is selected the CA will require only administrative access to work with, as shown in Figure 7-2.
Keep Use strong private key protection features provided by the CSP option deselected for this example and click Next Figure 7-2
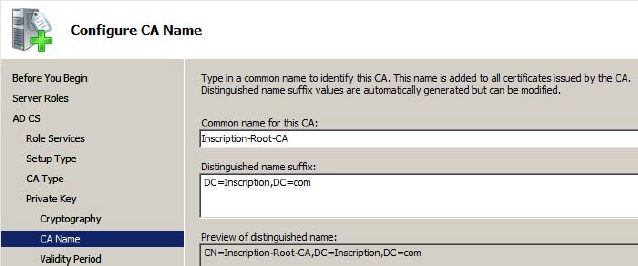
Modify the Common name of the CA in the Common name for this CA field and leave the Distinguished name suffix field as is. For this example modify the name to Inscription-Root-CA, as shown in Figure 7-3.The common name that you specify here will be embedded in each subordinate certificate issued by the name.
Click Next. Figure 7-3
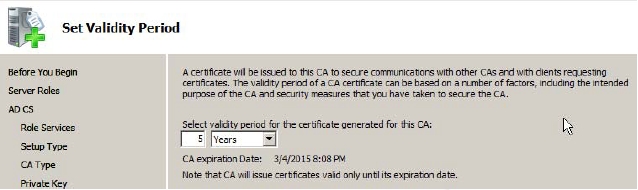
Modify the validity period of the CA in the Select validity period for the certificate generated for this CA fields if required on the Set Validity Period page, as shown in Figure 7-4 and then click Next. Figure 7-4
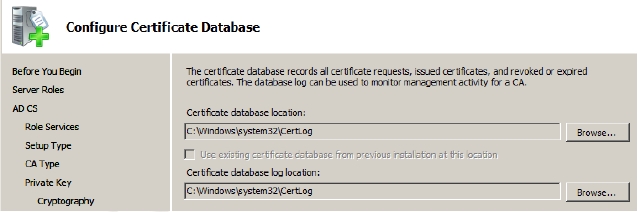
Accept the default values for the certification database or modify them if required on the Configure Certificate Database page, as shown in Figure 7-5 and click Next. Figure 7-5
Click Install on the Confirm Installations Selections pageThe installation process starts and you will now never be able to change the name of the server unless you uninstall AD CS first.
AD DS is one of the most important features of Windows Server 2008 and plays a very important role in the Windows network environment. Most organizations heavily depend on AD DS for communication and user management. The monitoring helps you to identify potential performance bottlenecks and ensure that all network servers are getting directory replication updates in a timely manner. It is therefore is very important to ensure the AD DS performance monitoring is meeting your business and networking goals.
Windows Server 2008 provides many monitoring tools such as Server Manager snap-in, Reliability and Performance Monitor snap-in, Microsoft Operations Manager or System Center Operations Manager, and command line tools such as repadmin.exe and Dcdiag.exe that are used to monitor AD replication.
By using a combination of the available tools, you can monitor many activities in Active Directory. The Reliability and Performance Monitor is a combination of reliability monitor and performance monitor. It allows you to monitor server performance in real time and determine how fast the server accomplishes the given tasks. Besides, it allows you to monitor hardware and application performance and create threshold alerts and performance reports.
It allows you to view the real-time hardware information such as CPU, Disk, Network, and Memory usage can be quickly viewed on the server. You can add counters such as the percent processor time. The Real-time counters allows you to find out how each of the resources is affected by demand on the server from things such as user access, processes running on the server, and resources served to users. Many of these counters can be used to determine current workloads. The AD performance indicators and statistics are useful in determining AD’s workload capacity.
Window Server 2008 have also introduced Data Collector Sets in the performance monitor, which allows you to a create data set containing performance counters. The custom data set you can configure alert activities when the performance counters reach threshold values.
The Reliability monitor allows you to measure of how often the server performs exactly the way you expect it to perform in relation to its configuration. It allows you to find out the performance of the server in terms of both hardware and software. It provides a System Stability chart that allows you to quickly view specific information about hardware, application, and Windows failures. It mainly relates to the server configuration rather than hardware configuration
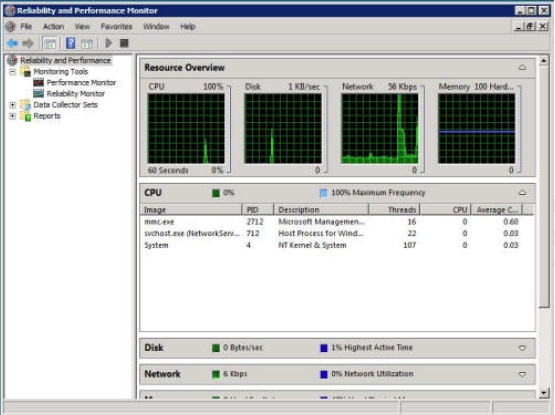
You can click on the CPU, Disk, Network, and Memory containers to find out how much resources each individual process is consuming. You can see an example of this in Figure 6-5:
Figure 6-5
As mentioned above, the AD DS monitoring also include monitoring AD DS replication performance. The AD DS replication monitoring allows you to troubleshoot problems, optimize replication, and provide ongoing support. The replication monitoring requires the monitoring of various variables related to replication such as: Intrasite versus Intersite replication, the compression used, available bandwidth, and inbound versus outbound replication traffic.
The performance counters available for AD replication monitoring are located within the Directory Services object and are prefixed with DRA (Directory Replication Agent). The two tools that can be used for the reporting and the replication are Replication Diagnostic tool (Repadmin.exe) and Directory Server Diagnosis tool (Dcdiag.exe).
The Repadmin allows you to diagnose Active Directory replication problems between the Windows domain controllers, display replication partners for a domain controller, display connection objects for a domain controller, and display metadata about an object, its attributes, and replication. This tool can be used to create and view the replication topology. It also allows you to monitor the relative health of an AD DS forest.
The repadmin command can be run from an elevated command prompt. The syntax for repadmin is:
The Dcdiag.exe performs a number of tests and reports on the overall health of replication and security for AD DS.
The most important task that network administrators need to perform is the management of Active Directory users, computers, and groups. A properly configured system ensures that only properly authenticated users and computers can logon to the network and access the resource. Windows Server 2008 provides many tools such as Server Manager and Active Directory Users and Computers to manage AD accounts.
The Active Directory Users and Computers snap-in allows you to create, modify, and delete AD objects which are nested inside Organizational Units. The Active Directory should be designed considering the security in mind. You may have separate OUs for each department that has different policies or different department with same kind of policies can be a part of just one OU.
AD objects in Server 2008 have meaningful names and include a Description column that tells you what each default object does. Each object is made up of a group of properties, which describe the object and what it can do. The properties windows of the object can be viewed by right-clicking the object and selecting Properties from the menu that appears. The most important objects of AD are Computers, Users and Groups.
The Computer object allows you to find out the computers on the network and the rights that each computer has on the network. It contains domain controllers, member servers, and workstations. However, the domain controllers are found in the Domain Controllers container. Member servers and workstations appear in the Computers container. Properties window of a computer object allows you to manage the computer object. The User object describes about the users of your organization. The properties window of each user allows you to configure the properties of the user.
There are different types of group objects in the Active Directory. For example, the security distribution group, which allows you to manage access rights for multiple users all at once. The other kind of group is the distribution group that is used solely for email distribution. Most of the maintenance tasks are performed with Active Directory Users and Computers. Some of the common tasks that you can perform with Active Directory Users and Computers include:
Create a new user: To create a new user, you need to right-click the OU or the container, where you want to add the new user and then click New-> User to start the New Object – User wizard that guides you through the process of creating the new user. Follow the prompts in the screen and provide the information asked.
Create a new group: To create a new user, you need to right-click the OU or the container, where you want to add the new group and then click New-> Group to start the New Object – Group wizard that guides you through the process of creating the new group. Follow the prompts in the screen and provide the information asked. For most common needs, the Global Security group is created.
Create an OU: To create a new OU, you need to right-click the OU or the container, where you want to add the new OU and then click New-> Organization Unit to start the New Object – Organization Unit wizard that guides you through the process of creating the new group. Follow the prompts in the screen and provide the information asked.
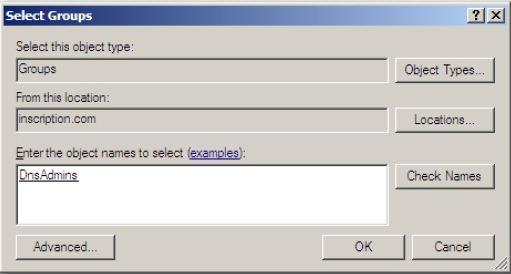
Add user to a group: To add user to a group, you need to right-click the user object and then select Add to a group. In the Select Groups window, type the name of the group in the Enter the Object Name to select field and click Check Names, as shown in Figure 5-7. Alternatively, if you don’t know the group name, then click Advanced and then click Find Now to display all groups. From the list of groups, select the group you want the user to belong to and click OK. Click OK again to close the Select Group window and finish. Figure 5-7
Change a password: To change the password, you need to right-click the user object and then select Reset Password. In the Reset Password window, type the new password in the appropriate fields and then select Users Must Change Password check box to force a user to change a password immediately. Click OK.
Unlock a user account: To unlock a user, you need to right-click the user object and then select Properties. In the Account tab of the Properties window, deselect the option Account is locked out.
Disable/Enable a user account: To disable a user account, you need to rightclick the user object and then select Disable Account. You can re-enable the account by right-clicking the user object and selecting Enable Account.
Move a user: To move a user from one container to another, you need to drag and drop the user to the target container.
Restrict logon times: To restrict the logon hours of a user, you need to right-click the user object and then select Properties. In the Properties windows click the Account tab and then click Logon hours. In the Logon Hours window, select Logon Denied and click the time blocks when you don’t want the user to log on.
Delete a group: To delete a group, right-click the group object and then select Delete from the menu that appears.
Delegate authority: To delegate the authority, you need to right-click the container object where you want to delegate tasks. Select Delegate Control. Follow the The Delegation of Control Wizard prompts on screen to add users or groups that you want to give control to and what powers you want to grant to those users or groups.
Allow users to use VPN: To allow users to use VPN, you need to right-click the user object and then select Properties. In the Properties windows click the Dialin tab. Select Allow Access. Alternatively, if you have implemented Windows Server 2008’s Network Access Protection, then click Control access through NPS Network Policy. Click OK to close.
Edit object attribute: To edit the attributes of an object right-click the object and then select Properties. In the Properties window click the Attribute Editor tab. Select the attribute that you want to modify. Click the Edit button. Make your change and click OK.
When you automate the creation of AD accounts, you need to create a user account template and then each time you need to create a user, you can copy the template and add the user details. The new account will be created will all the template details.
To create a user account template:
Create two OUs Staff and Group and create a Marketing group in the Group OU (for this example).
Click Start->Settings->Control Panel->Administrative tools->Active Directory Users and Computers.
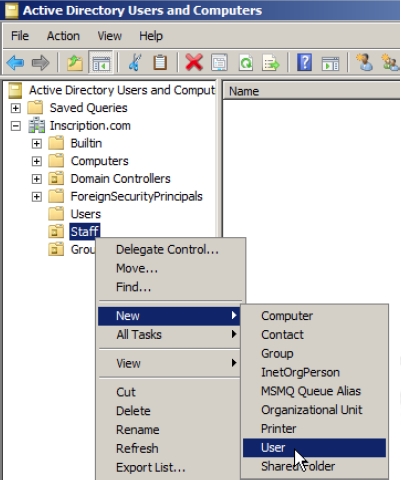
Expand the domain tree and right-click the Staff OU.
Select New->User from the menu that appears, as shown in Figure 5-1. Figure 5-1
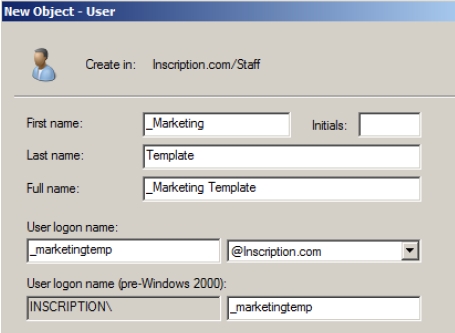
The New Object –User dialog box appears, as shown in Figure 5-2.
Type the template name prefixed with underscore (“_”) in the First name and then type Template in the Last name field . The underscore ensures that the template appears at the top of the list of users.
Provide the user logon name prefixed with underscore and click Next. Figure 5-2
The second page of the New Object –User wizard appears.
Type a password in the Password field and then confirm the password by retyping the password in Confirm password field.
Select Account is disabled option and then click Next and on the next page click Finish.
The template is now ready and you can see the template appearing in the Staff OU. You can now set the other properties in the template that you want to be set in all the users that are created using this template.
Double-click the template to open the properties window of the template as shown in Figure.
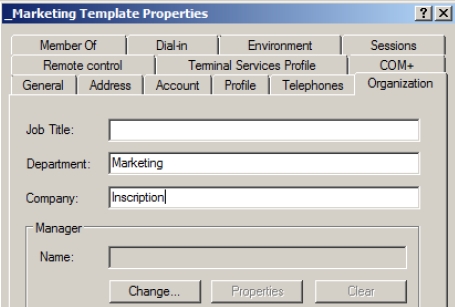
Click Organization tab and then set the Department and the Company fields with desired values. For this example set Marketing in the Department field and Inscription in the Company field, as shown in Figure 5-3. Figure 5-3
Click Member Of tab and then add the Marketing group to the list by clicking the Add button, as shown in Figure 5-4. Figure 5-4
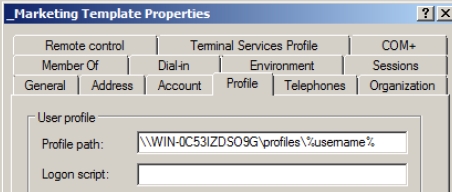
Click the Profile tab and then type the \\ \profiles\%username% in the Profile path field, where is the name of your server, as shown in Figure 5-5:
Figure 5-5
Click OK to save the properties set.
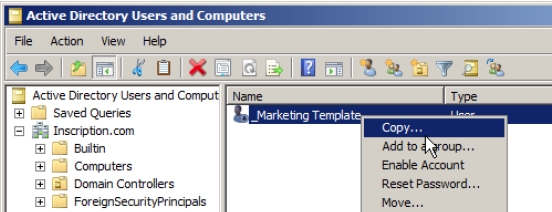
You can now right-click the template and select Copy from the menu that appears to open the Copy Object –User dialog box, as shown in Figure 5-6. The dialog box allows you to create a new user with the same properties that you have set in the template. You just need to follow the initial steps that you follow in the New Object –User wizard to create a user.
Figure 5-6
Besides creating the multiple users using a template, you can also automate the task of creating users by using command line tools such as the Dsadd command and import the users from a text file using CSVDE and LDIFE commands.
To add user called Jim using Dsadd, you need to type the following command at the command prompt:
dsadd user cn=Jim,cn=users,dc=MyDomain,dc=com -disabled no
CSVDE and LDIFDE commands can be used for the bulk export and import of Active Directory objects. CSVDE allows exporting of virtually any object or attribute from the AD database whereas LDIFDE.exe exports the data into LDIF-based (LDAP Data Interchange Format) files. Another difference is that LDIFDE is primarily used to modify or delete Active Directory Objects.
Type the following command to the command prompt to import directory objects:
You can now type the following command to import user records from the newuser.txt
Csvde –I –f newusers.txt –k
The LDIFDE.EXE does not want a typical delimited file. To create a .ldf file from which you can import user records, you need to save the text file with .ldf extension. The values in the .ldf files can be written as:
DN cn=ben jhonson, OU=people, dc=inscription,dc=com changeType: add CN: Ben Jhonson objectClass: user sAMAccountName: ben.jhonson userPrincipalName: ben.jhonson&inscription.com givenName: Ben sn: Jhonson displayName:Jhonson, Ben mail: ben.jhonson@inscription.com description: Sales representatives title: Sales representatives department: sales company: inscription, ltd
You can now type the following command to import user records from the newuser.ldf
Ldifde –I –f newusers.ldf -k
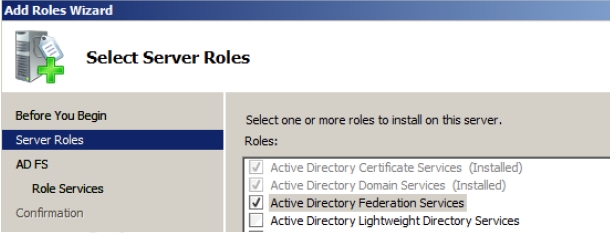
The AD FS is usually deployed in medium to large organizations that use multiple domains and have computers that run various operating systems. AD FS allows you to create a highly secure, extensible and Internet-scalable solution that can operate across both Windows and non-Windows multiple platforms.
AD FS can be installed if the domain runs either AD DS or AD LDS. It is tightly integrated with Microsoft Office SharePoint Server 2007 and AD RMS. AD FS is integrated with AD RMS in such a way that organizations can collaborate with external partners using the existing federated trust relationship.
Click Next on the first page of the Add Roles Wizard that appears.
Click Active Directory Federation Services option on the Select Server Roles page, as shown in Figure 4-32: Figure 4-32
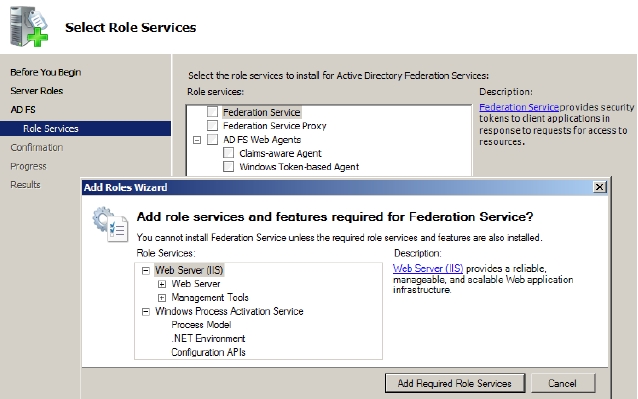
Select the Federation Service check box on the Select Role Services page and then click Add Required Role Services if the additional Web Server (IIS) or Windows Process Activation Service role services are not installed already, as shown in Figure 4-33. Figure 4-33
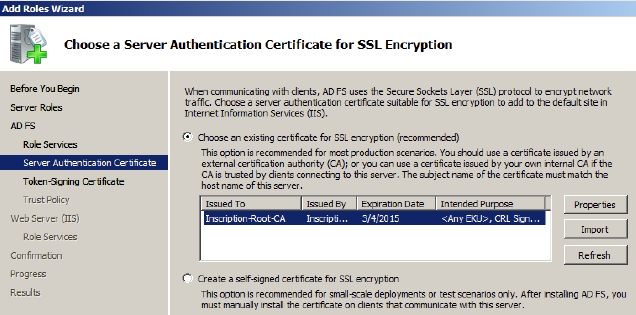
Select the certificate displayed on the Choose a Server Authentication Certificate for SSL Encryption page that appears and then click Next, as shown in Figure 4-34 . Figure 4-34
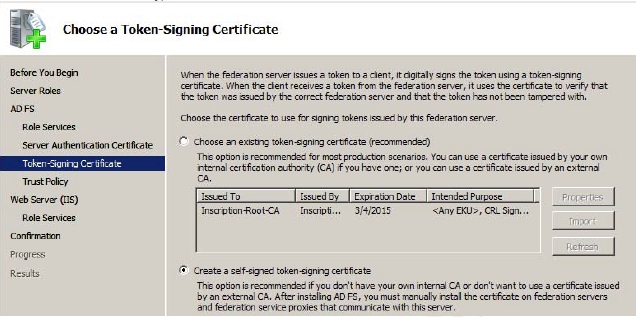
Click Create a self-signed certificate for SSL encryption option and then click Next. The Choose a Token-Signing Certificate page appears.
Click Create a self-signed token-signing certificate option and then click Next, as shown in Figure 4-35: Figure 4-35
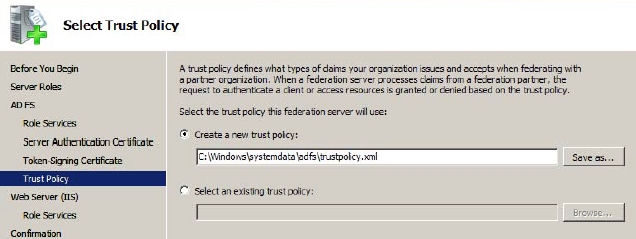
The Select Trust Policy page appears, as show in Figure 4-36.
Click Create a new trust policy and then click Next twice. Figure 4-36
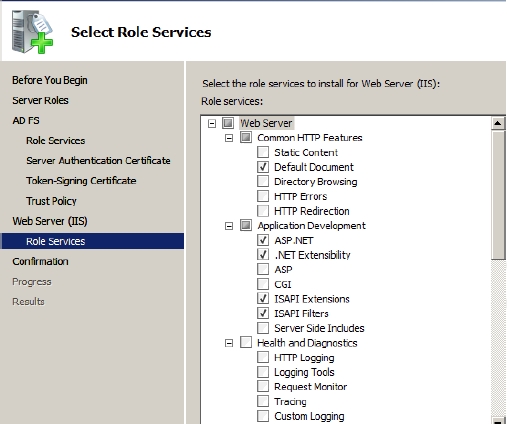
The Select Role Services page appears, as shown in Figure 4-37.
Accept the default values and then click Next. The Confirm Installation Selections page appears. Figure 4-37
Click Install. The Installation Results page appears.
Verify the installation and then click Close.
Before you configure AD RMS, you need to:
Install the AD RMS server on a Windows Server 2008 member server of the same Active Directory Domain..
Install Windows Server 2008 Enterprise edition on two member server of the same domain. These servers will host AD RMS policy servers..
Install Windows Server 2008 Enterprise edition on a member server of the same domain. This server will host SQL Server 2005 as a database server.
Reserve a few URLs for the AD RMS cluster that neither include a computer name nor use localhost and will be available throughout the lifetime of the AD RMS installation. Use different URLs for internal and external computers.
Create some domain user accounts and configure E-mal addresses for them in AD DS.
Create a standard user account as a service account and add it to Local Administrators group
Create a domain based service account and assign the Generate Security Audits user right to it.
Create a domain based user account that has local administrator privileges for installing AD RMS. Ensure that the account is not on the smart card. If the account needs to be used to generate server connection points then it must be a member of Enterprise Admins group and if it needs to use external database then it should be a member of System Administrators role on DB server.
Obtain secure sockets layer (SSL) certificate for the AD RMS cluster.
Store the cluster key in the AD RMS configuration database.
Create custom DNS alias (CNAME) record for the AD RMS cluster URL and for the database server.
Click Next on the first page of the Add Roles Wizard that appears.
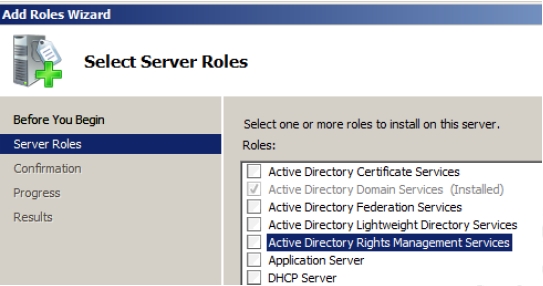
Select Active Directory Rights Management Services option on the Select Server Roles page, as shown in Figure 4-29. Figure 4-29
Click Next. The role services page appears.
Ensure that Web Server (IIS), Windows Process Activation Service (WPAS), and Message Queuing options are selected and then click Add Required Role Services.
Click Next. the AD RMS introduction page appears
Verify that the Active Directory Rights Management Server is selected on the Select Role Services page and click Next.
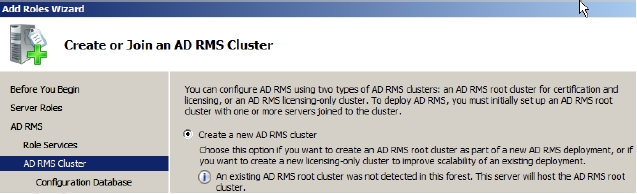
Select Create a new AD RMS cluster option and click Next on the Create or join an AD RMS Cluster page that appears, as shown in Figure 4-30. Figure 4-30
Select the Use a different database server option and then browse the name of the computer that is hosting AD RMS databases and then click Next.
Click Select to locate the database server and type the name of the database server, click Check names and then click OK.
Choose the appropriate database instance from the Database Instance dropdown, click Validate and then click Next.
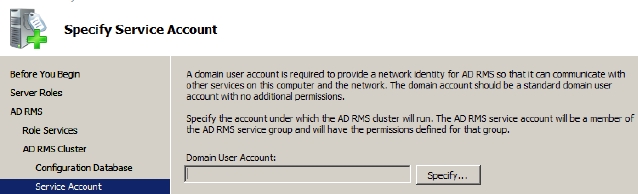
Click Specify and then type the domain user account and password that should be used as the AD RMS service account on the Specify Service Account page that appears, as shown in Figure 4-31.
Click OK, and then click Next. Figure 4-31
The Configure AD RMS Cluster Key Storage page appears.
Ensure that the Use AD RMS centrally managed key storage option is selected, and then click Next. The Specify AD RMS Cluster Key Password page appears.
Type a strong password in the Password field, rewrite the password again in the Confirm password field, and then click Next. The Select AD RMS Cluster Web Site page appears.
Select Default Web Site or select the web site where the AD RMS Web services will be installed and then click Next. The Specify Cluster Address page appears.
Select the Use an SSL-encrypted connection (https://) option.
Type the FQDN name of the AD RMS cluster in the InternalAddress field, and then click Validate. If validation succeeds, the Next button becomes active.
Click Next. The Choose a Server Authentication Certificate for SSL Encryption page appears.
Select the Choose an existing certificate for SSL encryption (Recommended) option, select the appropriate certificate or click Import to import the certificate, and then click Next. The Server Licensor Certificate page appears.
Provide a name that helps you identify the AD RMS cluster in the Friendly name field, and then click Next. The Register AD RMS Service Connection Point page appears.
Ensure that the Register the AD RMS service connection point now option is selected, and then click Next. This action will register the AD RMS service connection point (SCP) in AD DS. The Introduction to Web Server (IIS) page appears.
Click Next. The Select Role Services page appears.
Accept the defaults and click Next. The Confirm Installation Selection page appears.
Review your choices and then click Install.
Click Finish when the installation completes.
Log off from the server, and then log back again. Update the permissions granted to the logged on user account.This user account will automatically become a member of the AD RMS Enterprise Administrators group.
Creating an AD LDS instance
To create an AD LDS instance, you need to:
Install AD LDS on your server, using Add Roles Wizard through Server Manager.You can now start using AD LDS service by creating an AD LDS instance for the desired application. To create an AD LDS instance, you need to:
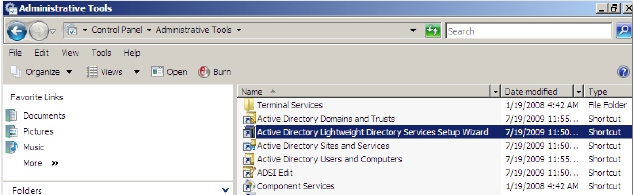
Select Active Directory Lightweight Directory Services Setup Wizard tool, as shown in Figure 4-1. Figure 4-1
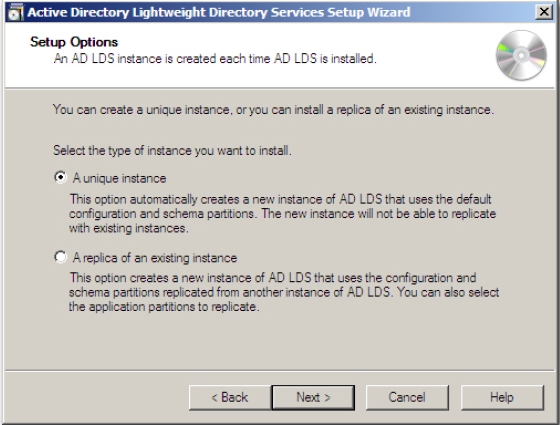
Click Next on the Active Directory Lightweight Directory Services Setup Wizard that appears.The Setup Option page of the wizard appears, as shown in Figure 4-2. The page provides you option to create A unique instance or A replica of an existing instance.
Select A unique instance option and click Next. Select the mentioned option because you are creating your first AD LDS instance in this example. Figure 4-2
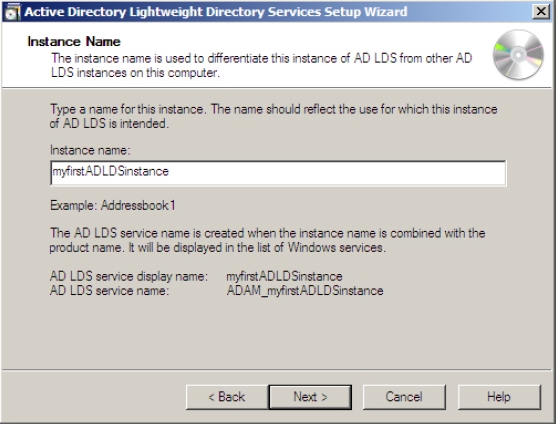
The Instance Name page appears, as shown in Figure 4-3.
Provide a meaningful instance name in the Instance name field and click Next.A meaningful instance name allows you to identify an instance that is tied to an application on the local computer. It also allows you to identify the associated files and the service that supports the instance. Figure 4-3
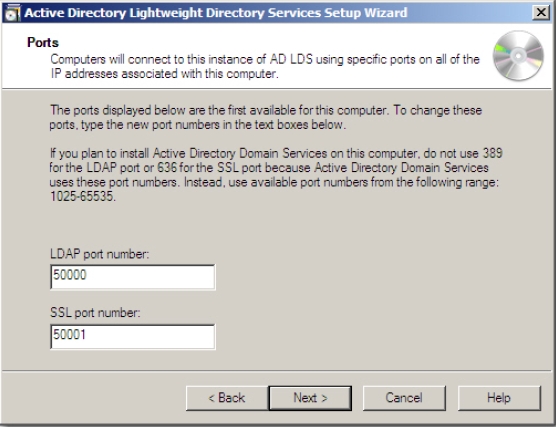
The page displays the first available communication ports that AD LDS instance would use for communication on this computer. Usually port 389 is provided by default in LDAP port number field and port 636 is provided in SSL port number field. These ports are the default ports for AD DS service also.
Because both these services use the same ports, Microsoft recommends using different server computers for both these services. However, there is no such restriction. If you want to use both the services on the same computer, you need to specify different ports for both these services.
If the wizard detects that AD DS is already installed on server and ports 389 and 636 are already in use, it proposes first available communication ports starting from 50000. It therefore proposes 50000 and 50001 ports for LDAP port number and SSL port number fields respectively.
Modify the default port numbers to 50000 and 50001 ports for LDAP port number and SSL port number fields respectively if AD DS is not already installed on server but you decide to install it in future else keep the default ports.
Click Next. Figure 4-4
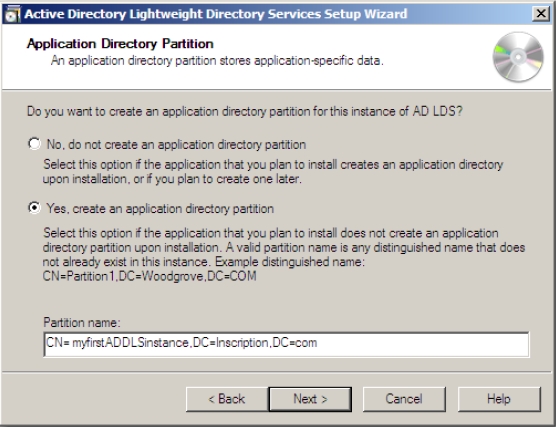
The Application Directory Partition page appears, as shown in Figure 4-5.
The application Directory partitions store Domain Name System (DNS) zones in a data structure in such a way that the data of the different zones can be distinguished for different replication purposes. The application directory partitions are created to control the scope of replication for the zone that is stored in that partition.
The page allows you to specify the name of Active Directory application partition name that you want to use for this instance. You can choose to create a new application partition or decide to proceed without creating a partition. If you decide to proceed without creating a partition you need to manually create a partition after the creation of AD LDS instance. You can use AD LDS administration tools later to create an application directory partition or create an application partition at the time of installing your directory-enabled application and tying it to an AD LDS instance.
You must specify a unique distinguished name for the partition in the following format:
CN=,DC=
The partition name is based on the fully qualified domain name. For example, if the instance name is myfirstADDLSinstance and the server name is Inscription.com, then the partition name would be represented as:
CN= myfirstADDLSinstance,DC=Inscription,DC=com
Specify a unique distinguished name for the partition in the Partition name field and click Next. Figure 4-5
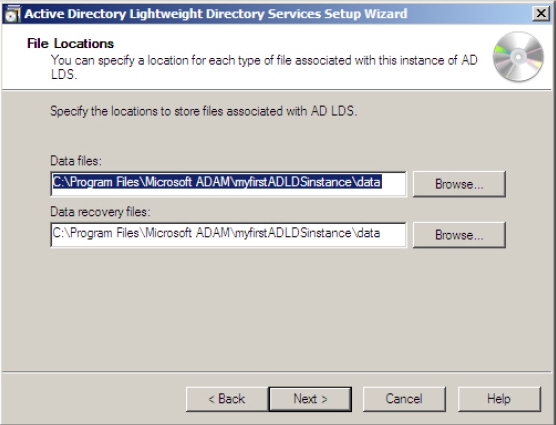
The File Locations page appears, as shown in Figure 4-6.
The page allows you to specify the locations of files associated with this AD LDS instance.
Provide a file location by typing or browsing the location for associated data files in Data files field and for data recovery files in Data recovery files fields respectively and click Next. Figure 4-6
The Service Account Selection page appears, as shown in Figure 4-7.
The page allows you to select a service account that will be used to run this AD LDS instance according to the permissions associated with the selected account. You can use Network service account option if you have to manage just one AD LDS instance. However, if you have many AD LDS instances then it is better to use service account or This account option for each instance
Select the desired account. Provide the credentials of the service account in the User name and Password fields if you choose This account option.
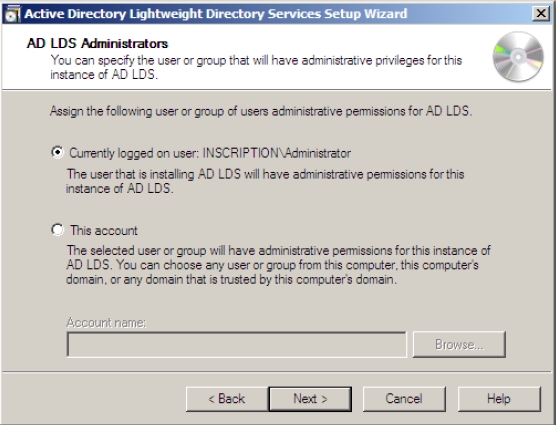
Click Next. The AD LDS Administrators page appears, as shown in Figure.The page allows you to select user account that will administer this AD LDS instance. It is always better to select a group on this page so that a group would have the rights to administer the AD LDS instance. This is because if the personnel change, in a group, members can be added or changed but an individual account is difficult to change.
Select Currently logged on user option if you want the current user to administer the instance. Alternatively, select This account option and Browse the individual account or a group account that you want to use to manage this AD LDS instance.
Click Next. Figure 4-7
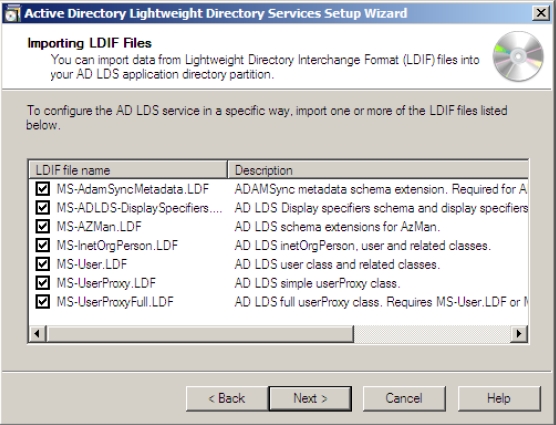
The Importing LDIF Files page appears, as shown in Figure 4-8.
The LDIF files extend the schema of the AD LDS instance. By default the seven LDIF
files are available. These files are:
MS-AdamSyncMetadata.ldf: Required to synchronize data between an AD DS forest and an AD LDS instance through ADAMsync.
MS-ADLDS-DisplaySpecifiers.ldf: Required for Active Directory Sites and Services snap-in operation.
MS-AZMan.ldf: Required to support Windows Authorization Manager.
MS-InetOrgPerson.ldf: Required to create inetOrgPerson user classes and attributes.
MS-User.ldf: Required to create user classes and attributes.
MS-UserProxy.ldf: Required to create a simple userProxy class.
MS-UserProxyFull.ldf: Required to create a full userProxy class.
Besides these seven LDF files, the following LDF files are also available:
MSadamschewmaw2k3.ldf: required to synchronize an AD LDS instance with AD DS in Windows Server 2003.
MSadamschewmaw2k8.ldf: required to synchronize an AD LDS instance with AD DS in Windows Server 2008.
However, you can create your own ILDF files and store them in %system root%\ADAM folder.
Select the files that you want to import and click Next. Figure 4-8
The Ready to install page appears. The page displays all the selections you made through wizard to create an AD LDS instance.
Verify the selections you made and click Next.The Installing AD LDS page appears displaying the progress of AD LDS instance creation. The Completing the Active Directory Lightweight Directory Services page appears.
Click Finish. The AD LDS instance is created and is ready to use.
The AD DS contains a data store called ntds.dit that it uses for identity and management of AD objects. This database file contains directory partitions, which is also called the naming context. Each naming context contains objects of a particular scope and purpose. The major naming contexts are:
Domain: This naming context contains all the objects stored in the domain including users, groups, computers and group policy containers.
Configuration: This naming context contains objects that represent the logical structures or the physical topology of the forest including domain, sites, subnets, and services.
Schema: This naming context defines the object classes and other attributes of the entire directory or the database.
Traditionally the replicas of the domain controllers were the complete replicas but now days, when the replication occurs between domain controllers, the entire directory is not copied; rather some of the naming contexts are copied to other domain controllers. For example the domain naming context is replicated to all the domain controllers within the domain but not to the domain controllers outside the domain. The configuration and schema naming contexts are replicated to all the domain controllers in a forest.
The Active directory also supports Application Directory Partition that stores only the object required by an application or a service. This partition is only a portion of the data store. The good thing about the application partition is that they can be replicated to specific domain controllers because they are not replicated to all the domain controllers by default.
The AD replication ensures that the information on each domain controller in a domain contains the same and consistent information. Although the information may not be exactly the same at any one moment in time because the changes are constantly been made, the replication ensures that all the changes to a partition are transferred to all the replicas of the partition.
The replication topology need not be created manually. It is automatically generated and optimized by an AD component called Knowledge Consistency Checker (KCC) among the domain controllers in the same domain. KCC creates connection objects that connect two domain controllers of different sites that participate in replication. The connection objects can also be created manually to force replication.
The replication can be of two types:
Intrasite replication: Refers to the replication that occurs between the domain controllers on the same site. It is faster as compared to intersite replication because it is done on the objects on the same site. You need to configure site links to configure intrasite replication.
Intersite replication: Refers to the replication that occurs between different sites.
Configure Site Links
The site link is a logical and transitive connection between two or more sites that allow the replication between two sites. KCC uses site links to determine the replication path between the two sites.
To configure site links, you need to:
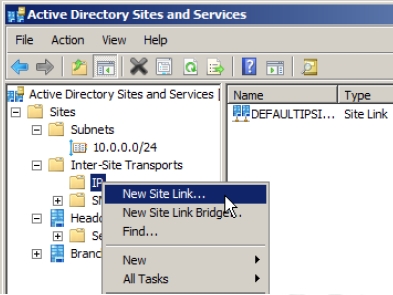
Open Active Directory Sites and Services snap-in by clicking Start- >Administrative Tools-> Active Directory Sites and Services.
Expand Inter-Site Transports folder and right-click either IP or SMTP folder depending on the protocol that you want to use to create a site link
Select New Site Link from the menu that appears, as shown in Figure 3-20: Figure 3-20
The New Object –Site Link dialog box appears, as shown in Figure 3-21.
Provide the name of the site link.
Select the sites that you want to connect from the Sites not in this site link list and click Add
The selected sites will be moved to Sites in this site link list. If the sits already belong to the same link they will automatically appear in the Sites in this site link list.
Click OK.
The site link is created between the selected sites.
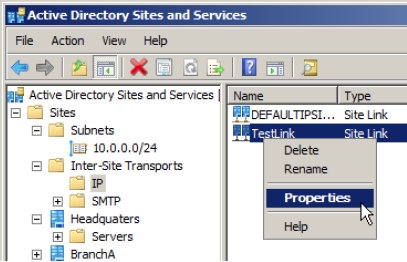
After configuring a site link, you can configure its various attributes such as: site link cost, site link replication frequency, site link replication availability, and site replication schedule.
To configure the site link, attributes, you need to:
Right-click the site link that you want to configure in the Active Directory Sites and Services snap-in and then select Properties from the menu that appears, as shown in Figure 3-22. Figure 3-22
The properties window for the selected link appears, as shown in Figure 3-23.
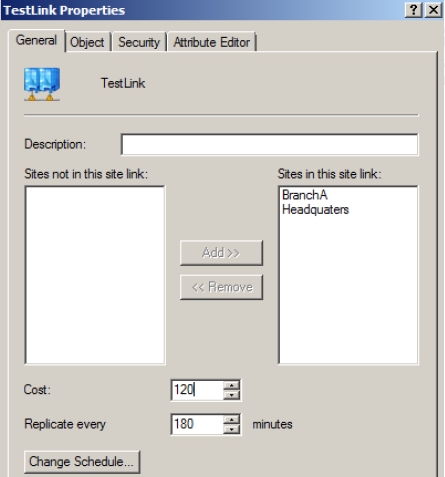
You can configure the Cost and the Replicate every fields.
The cost refers to the cost of connection with respect to speed of the link. The lower costs are used for fast links. For example, consider you have two connections, T1 line and a dial up connection. So if you configure lower cost for T1 connection, the T1 connection will always be used till it is unavailable. The default cost is 100.
Modify the Cost field as desired.The Replicate every field allows you to configure the replication frequency for the site link. The minimum value for the field is 15 (minutes) and maximum value is 10080 (7 days).
Modify the Replicate every field as desired. Figure 3-23
You can also configure the replication availably schedule for the site link by clicking Change Schedule button on the properties window for the selected link.
The trust relationships can be created in Active Directory by launching New Trust Wizard from a domain to create external, realm, shortcut, or the forest trust. The procedure to create any kind of trust is almost same except a few configuration screens on the New Trust Wizard.
Follow the steps given below to create External trust:
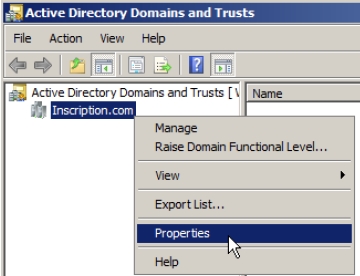
Click Start->Administrative Tools-> Active Directory Domains and Trusts to open the Active Directory Domains and Trusts snap-in, as shown in Figure 3-8. Figure 3-8
Right-click the domain for which you want to create trust and then select Properties from the menu that appears.
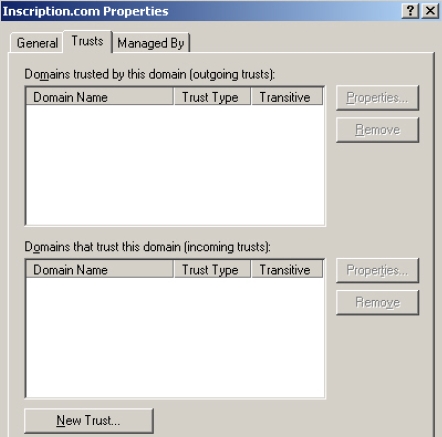
Click Trusts tab and then click New Trust button, as shown in Figure 3-9. Figure 3-10
The New Trust Wizard appears.
Click Next on the welcome page. The Trust Name page appears, as shown in Figure 17:
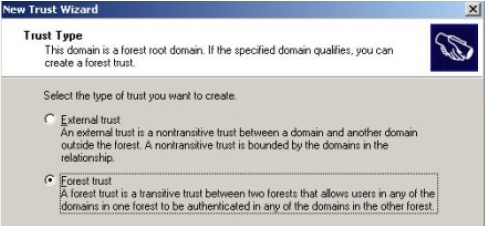
Provide the name of the domain with which you want to establish trust of this domain and click Next. The Trust Type page appears if the forest functional level is set to Windows Server 2008, as shown in Figure 3-11.
Select External Trust option and click Next. Figure 3-11
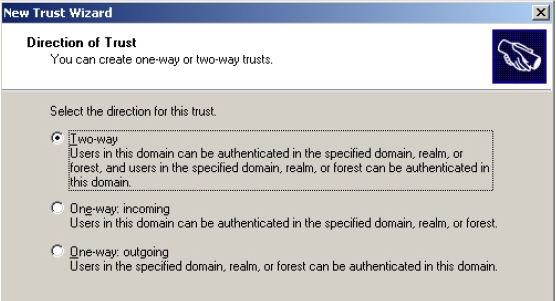
The Direction of Trust page appears with options of Two-way, one-way incoming, and one-way outgoing trusts, as shown in Figure 3-12. As their name suggests the users will be authenticated in both the domains, in the current domain and in the specified domain respectively.
Figure 3-12
Select the direction of trust that you want to establish and click Next.The Sides of Trust page appears with following options if you select Two-way in the Direction of Trust page:
This domain only: Allows you to create trust in local domain.
Both this domain and the specified domain: Allows you to create trust in local domain and the specified domain. You can choose this option if you have trust creation privileges in the specified domain also.
Select the desired side of trust option and click Next.The Outgoing Trust Authentication Level-Local page appears if you select Two-way option in the Direction of Trust page and This domain only option in Sides of Trust page. The page displays following two options:
Domain-wide authentication: Allows you to authenticate all users of the domain for all the resources in the local domain
Selective authentication: Allows you to provide specific authentication to each user.
Select the desired authentication level and click Next. The Trust Password page appears.
Provide a password for the trust in the Trust password field and then retype the password in the Confirm trust password field to confirm the password you have specified and click Next.
Verify the trust settings on the Trust Selections Complete page that appears and click Next. The Confirm Outgoing Trust page appears.
Select Yes, Confirm the outgoing trust option if you have created both sides of trust else select No, Do not confirm the outgoing trust option and click Next.The Confirm Incoming Trust page appears.
Select Yes, Confirm the incoming trust option if you have created both sides of trust else select No, Do not confirm the incoming trust option and click Next.
Click Finish in the Completing the New Trust Wizard page.The External trust will be created between the selected domains and will appear on the Trust tab of the Properties page.
Follow the steps given below to install and configure an Active Directory Domain Controller:
To Install AD DS on the server, you need to:
Log on to the server with local Administrator account.
Click Add roles under Customize This Server in the Server Manager window, if it opens automatically.Alternatively, you can click Start-> Settings->Control Panel-> Administrative Tools- >Server Manager and then right-click the Roles node and select Add Roles. The Add Roles Wizard appears.
Verify the requirements to add roles on the server and click Next. The Select Server Roles page appears.
Select Active Directory Domain Services option from the Roles field and click Next. The Active Directory Domain Services page appears. The page provides you all the information about AD DS that you may need to know before installing and using this service.
Click Next. The Confirm Installation Selection page appears.
Click Install. The Installation Progress page appears. After the installation is complete, the Installation Results page appears
Click Close.
Type dcpromo.exe in the Run dialog box. The Active Directory Domain Services installation Wizard appears.
Click Next. The Operating System Compatibility page appears. The page provides you information about Windows Server 2008 compatibility with older versions of Windows.
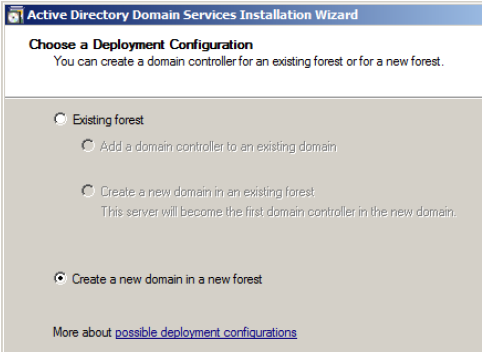
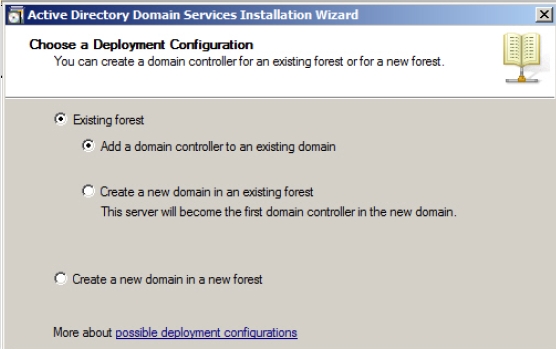
Click Next. The Choose a Deployment Configuration page appears.The page provides you options to use the existing forest and create a new domain or add a domain controller to it or create a new domain in a new forest.
Select Create a new domain in a new forest option and click Next, as shown in Figure 3-1.The first domain created in your forest becomes the forest root domain. You can keep this existing domain as a forest root domain or create a dedicated forest root domain in a multidomain scenario. If you have a single domain forest then the forest root domain will contain all the users, groups, and resources. However, if you have a multiple domain forest and you create a dedicated forest root domain, then it will contain only forest administration accounts. Figure 3-1
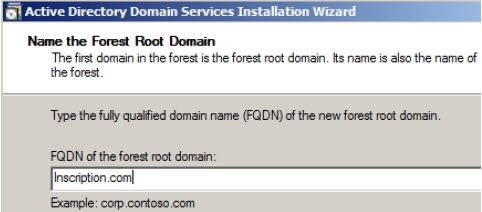
Type the complete name of the forest that you are creating in the FQDN of the forest root domain field on the Name the Forest Root Domain page that appears, as shown in Figure 3-2.
Click Next. Figure 3-2
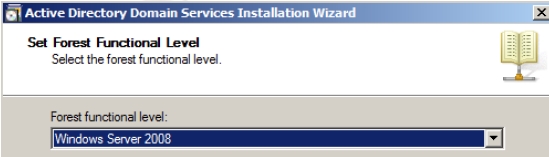
Select the forest functional level as Windows Server 2008 from the Forest functional level dropdown on the Set Forest Functional Level page that appears, as shown in Figure 3-3.Each forest functional level supports certain features. Windows Server 2008 supports three forest functional levels. These functional levels are:
Windows 2000: Windows 2000 functional level is the baseline, default functional level that allows domains running at domain functional levels: Windows 2000 native, Windows Server 2003, or Windows Server 2008.
Windows Server 2003: This functional level allows a domain controller running Windows Server 2003 to interact with Windows Server 2003 or Windows Server 2008 domain controllers. The forest functional level should be Windows Server 2003 when there are only Windows 2003 or Windows 2008 domain controllers in the domain. This level supports forests trusts, domain rename, linked value replication, and RODC.
Windows Server 2008: This functional level does not add any new forest wide features. This forest level allows only Windows Server 2008 domain controllers to be added to the forest.
Select the appropriate forest functional level and then click Next.The forest functional level can be raised at a later stage also through Active Directory Domains and Trusts snap-in when the AD DS is installed. However, you should only raise the functional levels when you are sure that you will not need any new domains to be added at unsupported functional levels because you cannot roll back to the previous functional level. Figure 3-3
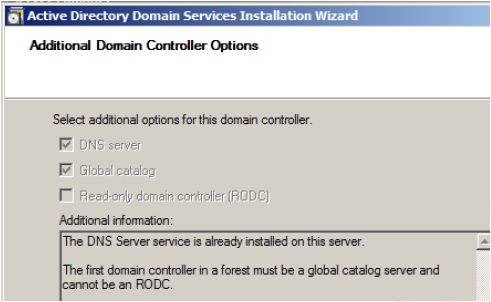
The Additional Domain Controller Options page appears, as shown in Figure 3-4. The page allows you to select the additional roles for this domain controller. All the options: DNS Server, Global Catalogue, and RODC appear disabled. This is because the DNS server role is already installed on the server, the first domain controller in a forest must be a Global Catalog therefore it must be selected, and the first domain controller in a domain cannot become an RODC.
Click Next. Figure 3-4
If you have not already assigned a static IP address, then a warning message appears.
Click the Yes, the computer will use a dynamically assigned IP address (Not Recommended option) option.
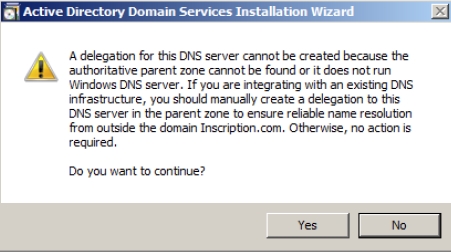
Another warning message appears that server cannot create a delegation for this server, as shown in Figure 3-5. Click Yes to continue with the installation because you can create the delegation later. You get this message at the time of installing the first domain controller in a forest/domain. Figure 3-5
Accept the default locations for the Database folder, Log files folder, and SYSVOL folder on the Locations for Database, Log Files, and SYSVOL page that appears and click Next, as shown in Figure 3-6. Figure 3-6
Type a strong password on the Directory Services Restore Mode Administrative Password page, confirm it, and then click Next.
Confirm your selections on the Summary page and click Next. The DNS installation starts.
Select Reboot the computer and wait for the computer to boot again.
You can add child domains or new domain trees to your forest root domain.
To create a child domain you need to:
Install Active Directory on a Windows Server 2003 by clicking Start->Run and the typing dcpromo in the Run dialog box that appears.
Select Add a Domain controller to an existing domain option in the Choose a Deployment Configuration page and click Next, as shown in Figure 3-7. Figure 3-7
Type inscription.com in the Type the name of any domain in the forest where you plan to install this domain controller textbox in the Network Credentials page.
Select My current logged on credentials option and then click Next
Select inscription.com in the Select a Domain page and click Next.
Select Default-First-Site-Name in the Select A Site page and then click Next. The Additional Domain Controller Options page appears.
Follow the steps from 16-22 given in Install and Configure Active Directory Domain Controller section.
The child domain will be created under the specified parent domain.
Configure Domain Name System (DNS) for Active Directory